Monday, December 27, 2010

A very orange card


I hope everyone had a good Christmas and thanks everyone who gave the store presents and cards this year! Very much appreciated.
Just a reminder that Crafty Capers is closed this week for inventory and holidays. We will reopen Monday Jan 3 @ 10 am.
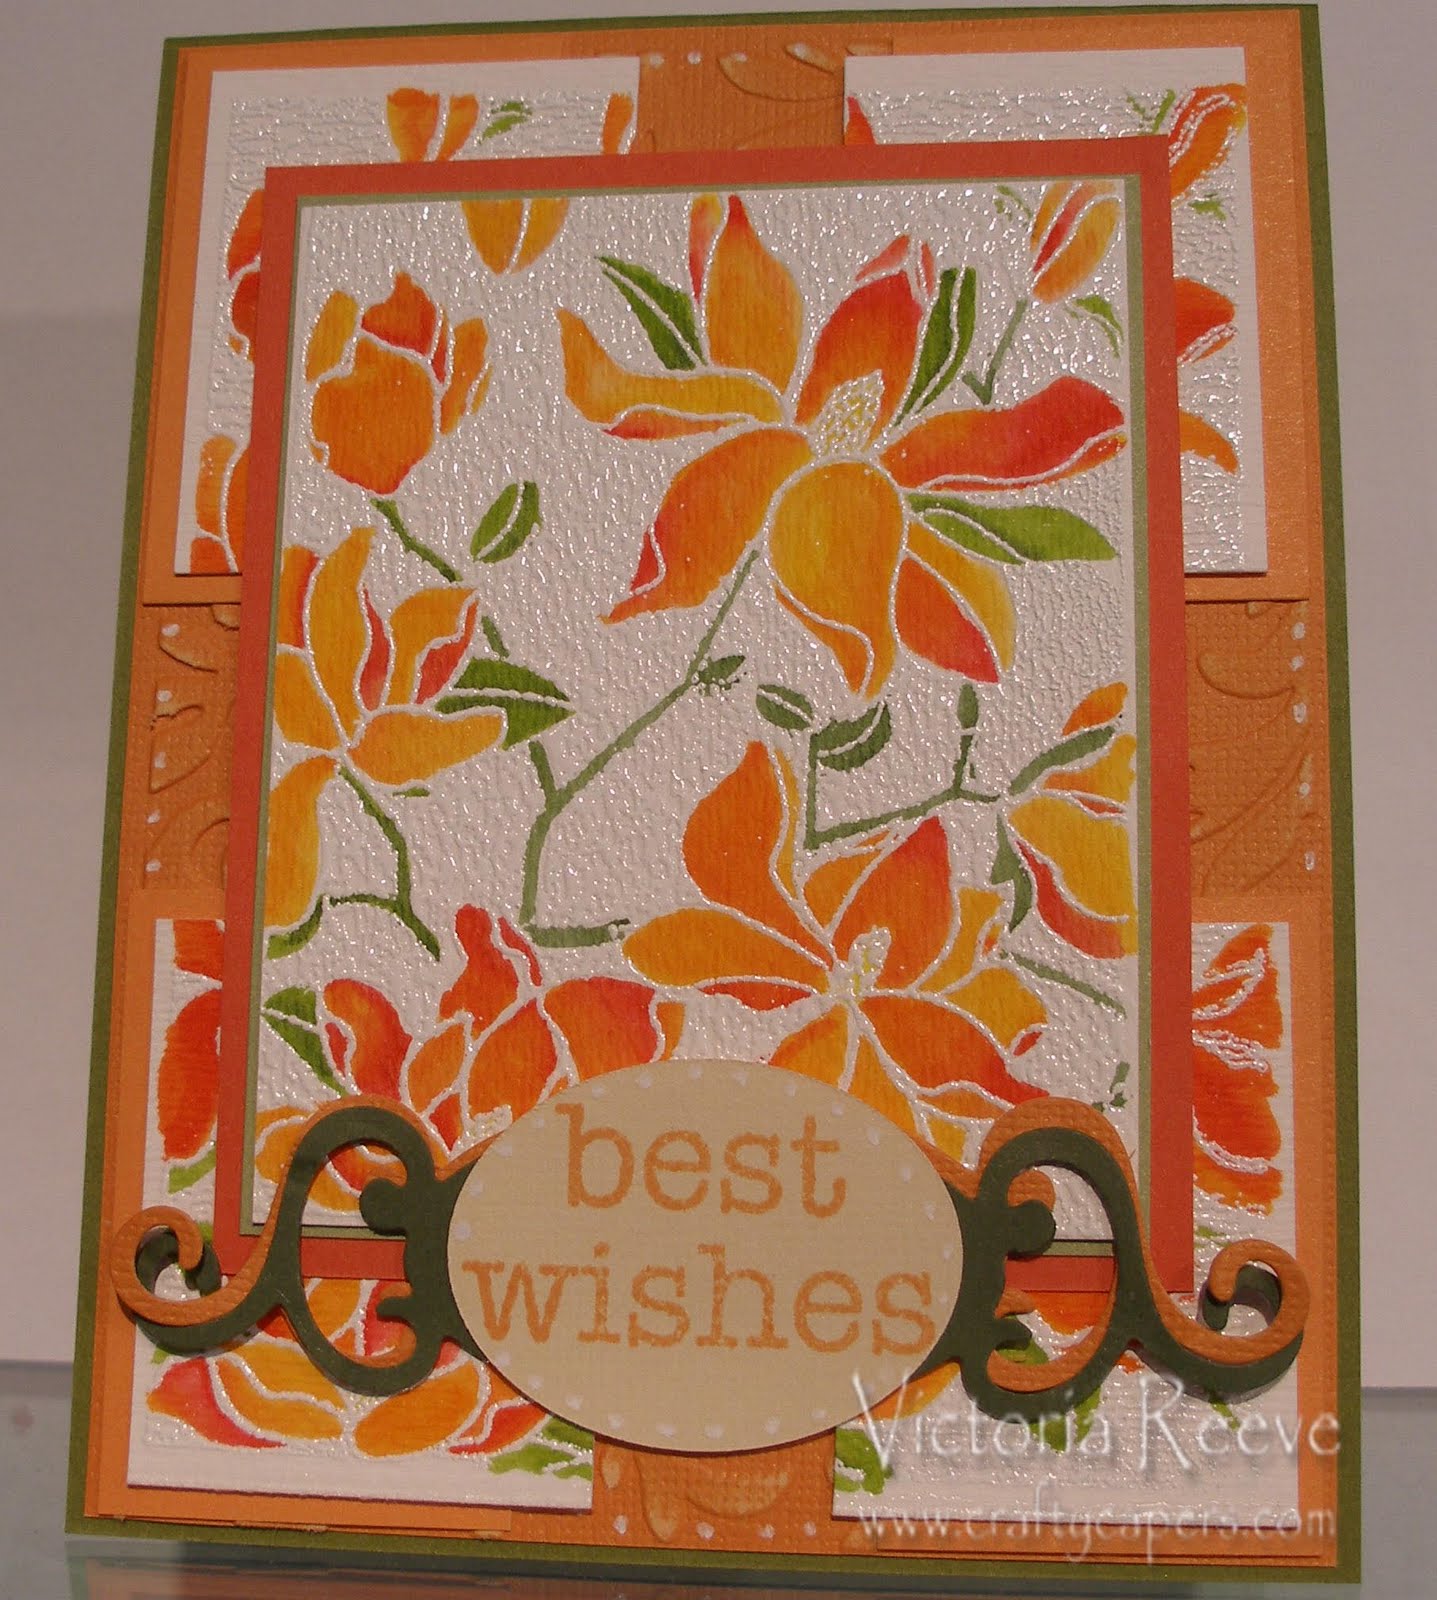
I had so much fun doing this card and I am really pleased with how it turned out. I got my inspiration from the new 2011 Hero Arts catalogue. There is a card sample in there colored in similar colors and as soon as I saw it I knew I had to try that color combo!
This stamp (Large Blossom) is a reverse image which means when you stamp the background is your ink/embossing powder color and the flowers are the paper color. I started by embossing this image twice on watercolor paper with Zing white embossing powder then I pulled out my trusty Tombow markers and got coloring! It was really tough seeing the white embossing powder on the white paper but I am nothing if not stubborn! :) I mounted 1 image with green and orange paper and cut the second image into 4 pieces and matted them with orange cardstock. I cut a piece of Tangerine Coorindations cardstock and embossed it with a Cuttlebug embossing folder and lightly sanded it to reveal the lighter inner core. I cut out 2 of the same Spellbinder tag one in green and one in orange and layered them. I used a Spellbinder oval to stamp my sentiment on. I added some white dots on the oval as well as the large orange mat for some interest.
Thanks for looking!
Card Recipe:
Stamps: Hero Arts Cl371 Essential Messages & CG271 Large Blossom
Tombow markers: 126, 158, 025, 055, 912,985, 933, 845, N00 (Blender Pen)
Paper: Watercolor, A Muse, Coredinations & Bazzil
Other: Zing white embossing powder, Tombow white gel pen, Memento Tangello ink, Spellbinder Fancy Tags and Large Classic Ovals, Victoria Cuttlebug folder (the best one!)

Saturday, December 25, 2010

Boxing Day Sale Tomorrow!


Merry Christmas everyone! Hope you all had a great celebration!
Just a quick reminder that tomorrow is Crafty Capers Boxing Day Sale. Lots of deals to be had between 10 am - 2 pm.
Now onto the card. I was going for a quick and clean card here. The apple image is colored with my Prismacolor pencils. I embossed the main cardstock with a Crafts Too embossing folder. I think the rest is self explanatory.
Thanks for looking!
Card Recipe: Magenta apple image, Penny Black Happy Birthday
Ink: Versafine Onyx Black, Adirondack dye Cranberry
Other: A Muse Pretty Pearls (cranberry)

Friday, December 17, 2010

Hero Arts Debut Party Saturday Dec 18!


After much drama we have received our BRAND NEW HERO ARTS Stamps! Here is a sneak peak of a couple of the new stamps available at Crafty Capers Dec 18.
We will have Free Make and Takes (please bring your adhesive and pop dots), tasty treats, door prizes and the new catalogue to browse.
This card is fairly simple. I found an oval window cut out of a scrap of Stardream cardstock. I stamped the Hero Arts Dictionary Greetings with my Broken China Distress ink then sponged the edges with the same pad. I edged the inside of the oval with Peeled Paint Distress ink. I then stamped the bike inside the oval.
I stamped the sentiment on a scrap of green cardstock and matted it. I finished the card by adding a Hero Arts Spring Felt Flower and some dots with my 126 Tombow marker around the bike.
Hope to see you at the party!
Card Recipe:
Stamps: Hero Arts Joy Ride & Dictionary Greetings
Ink: Distress Broken China and Peeled Paint, Versafine onyx
Paper: Stardream and Bazzill
Other: Hero Arts Spring Felt Flower

Thursday, December 16, 2010

Something a bit different


Well all the 2010 cards are done and all the ones that needed to be mailed are in the mail as well! Yeah!
I thought I would do something completely different from a Christmas card.
I found this Kaiser Craft gem butterfly and thought I would work a card around it. I managed to use some funny scraps as well. I found the die cut swirl (Spellbinder) already cut out of Bazzill Bling cardstock in my stash and an ancient piece of designer K&Co paper.
Most of the card is self explanitory however I did stick the butterfly on a piece of lavender cardstock and took my 636 Tombow marker and blender pen and did an indirect blending method inside the butterfly to jazz it up a bit (as if all those jewels are not jazzy enough!).
Thanks for looking and hope everyone's December jobs are getting done in a timely fashion!
Card Recipe:
Stamps: Penny Black ...To you (2908F)
Paper: K&Co, Bazzill cardstock and bling cardstock
Embellishments: all Kaiser Craft
Ink: Adirondack Brights Purple Sunset dye

Friday, December 10, 2010

Not a creature was stirring


Now isn't this a peaceful scene? Here is another Stampscapes card I've whipped up in my mad dash to get my cards finished.
The scene is done on white glossy cardstock and colored with stipple brushes.
The sentiment was stamped with black Archival ink then highlighted with my Inkessentials white gel pen.
Thanks for looking!
Card Recipe:
Stamps: All Stampscapes except sentiment which is by Stampendous
Paper: white glossy cardstock, bazzill and A Muse cardstock
Inks: Archival Black, Adirondack Cloudy Blue, Sail Boat and Denim
Other: Inkessentials white gel pen, Stickles

Wednesday, December 8, 2010

Dashing through the snow...


I was playing with the Impression Obsession Shake It Pouches (in this case the square one) and came up with this card. For those not familar with shaker cards you make a pouch and put beads, glitter, punch outs etc in the pouch and a picture behind the shakey stuff so you can shake the card and have "snow" around the image.
This image was embossed with Crafty Capers Teddy Bear embossing powder and I added microbeads and some sequins to the pouch.
Thanks for looking!
Card Recipe:
Stamp: Hero Arts reindeer
Paper: Bobunny
Other: micro beads, May Arts ribbon & Teddy Bear embossing powder

Tuesday, December 7, 2010

Wishing you a green Christmas


I have a couple of friends who are "green crazy" and one of them sent me a similar scene all done in green. I decided to challenge myself to see if I could make a similar Stampscapes scene. I'm pretty happy with how this turned out! It's not quite the same as the one I was copying but I am happy with it never the less! Especially considering my eye is still a bit wonky.
This card started out as a piece of white glossy cardstock and I used a bunch of stamps and ink and tried out the Stampscapes "tonal applicator" stamp (a tear drop shaped stamp filled with tiny dots). The steps are too involved to get into on this blog. If anyone has any questions please don't hesitate to contact me. I have not yet decided it this card is appropriate for a Christmas card or not but it might become one because I am still short of cards.
Card Recipe:
Inks: Archival Black ink, Adirondack dye Lettuce, Meadow & Citrus
Stamps: Stampscapes small lakeside cove, pines and rocks, cumulus clouds, tonal applicator, ripples & pine row
Other: white glossy cardstock, Bazzill cardstock & Magenta Peel Offs

Monday, December 6, 2010

Christmas is coming!


Still trying to get my Christmas cards done!!
I can't say I am 100% happy with how this turned out maybe I should have put everything on crooked and I would have liked it better! lol.
Another simple card hardly any stamping except the tree (Hero Arts) stamped on patterned Bo Bunny Paper.
Just a reminder that next Saturday Dec 11 is Crafty Capers Hero Arts 2011 stamp debut party. Come join us for make and takes, door prizes and a peek at the brand new 2011 Hero Arts catalogue oh yea we'll also have new stamps to purchase as well!
Card Recipe:
Stamp: Hero Arts tree
Paper: BoBunny, Radiance Vellum, Bazzill
Other: Ribbon, Versafine Onyx ink and Victoria Cuttlebug folder (the best folder there is!)

Saturday, December 4, 2010

Lovin' T!m's dies


Crafty Capers has started bringing in some of Tim Holt's Sizzix dies and I must say I am loving them! They cut through the thickest cardstock with no trouble using my Cuttlebug. This ornament is from the curved ornaments set. I'm so glad I bought it and can't wait to get some more!
This card is one I cased from a magazine my friend Sharron had. She brought so many magazines into the store for my viewing pleasure I honestly don't remember which one it came from - sorry!
Anyway, pretty simple design and used up quite a bit of my scrap silver/grey cardstock which is always a plus!
Thanks for stopping by!
Card Recipe:
Stamp: A Muse (sentiment)
Die: Tim Holtz
Cardstock: Stardream, Bazzill and other
Other: Cuttlebug embossing folders, A Muse gems, crotchet cotton

Friday, December 3, 2010

A very glam card


I'm going to have to wrack my brain to figure out who this card is going to. I really think it needs to go to someone very glam!
As soon as I saw this image in the Penny Black winter catalogue I loved it! I had no idea what to do with it but I loved it!
Finally got it out to play with several months after it arrived in the store! I embossed the image on what cardstock and colored her with Perfect Pearls mixed with water. She is nice and shimmery in real life. I thought the white cardstock background was a little dull and I did not want to cut her out with my bad eye so I pulled out a holly stamp and stamped a random backgound with it and Tea Die Distress ink. I matted everything as shown and added gems and pearls to give the card even more pizzaz.
Don't forget this weekend is the Hero Arts Debut party at Crafty Capers hope to see you there!
Card Recipe:
Images: Gal and holly - Penny Black, Sentiment - A Muse
Paper: Bazzill and unknown
Inks: Versamagic and Distress Tea Die
Other: Perfect Pearls (for coloring), A Muse gems and pretty pearls

Warm Winter Wishes!

Wow is 2010 flying by fast! I've just realized that once again it is December and I have quite a few more cards to make and send out in the next week or so! Why do I do this every year?? I have a bit of an excuse this year first I got that horrible cold that lasts for a few weeks then I managed to get a bad case of iritis (where the iris/colored part of your eye gets inflamed) and have, temporarily I hope, lost the vision in 1 eye! It is supposed to be agonizingly painful but thankfully, I have missed that part. I have lots of drops/ointments etc to put in my eye on a very regular basis but I am really appreciating how important 2 eyes are for getting layers on straight on cards. So excuse any ascew mats and layers. :)
This card is fairly straight forward. Lots of layers, for me at least, and a bit of coloring with my Tombow markers. I stamped the gal's sled twice so she is bringing extra presents to whoever lives in that house. I added white Liquid Applique to the snow on the house and the fur on the gal's coat and of course Stickles every where else. I have added a close up photo of the house/Liquid Applique I hope you can see it (I can't).
Card Recipe:
Stamps: House - Hero Arts, Gal and sentiment - A Muse
Coloring: Tombow Markers
Paper: Watercolor, Bazzill and A Muse
Ink: Versafine Onyx and Memories Midnight Blue
Other: Liquid Applique, Diamond Stickles and scallop border Borderabilities by Spellbinder.


Monday, November 8, 2010

A Manly birthday card


My brother in law's birthday was this past weekend and I got the old "can you make my brother a card" on Thurday evening! Thank goodness I had a good case of mojo going on!!
This is another Stampscapes creation in case you don't recognize the style.
I tried my hand at stippling (using a stencil type brush to apply inks) on white glossy cardstock. I'm pretty happy with how it turned out!
I matted the image on a piece of Bazzill cardstock and used linen texture cardstock for the main cardstock.
I stamped my sentiment and added dots using a Tombow marker.
Card Recipe:
Stamps: All by Stampscapes: Lakeside cove (049G), Reeds (067B), Duck Trio (023A) & Leafy Branch (277F)
Inks: Ranger Adirondack (dye) Pool, Stonewashed, Pesto, Juniper, Lemonade, Sunshine Yellow, Sunset Orange & Red Pepper. Ranger Archival Jet Black
Other: Tombow marker & Glossy Cardstock

Christmas Pelican


I did another Tombow marker class a few weeks ago so have been on a bit of a Tombow kick again. I've been eyeing this image for a couple of years now and I was lucky enough to have a friend lend me this stamp! Thanks Leslie!
I stamped this Impression Obession image on watercolor paper with my Versafine Onyx black ink and colored him with my Tombow markers and bender pen.
I added Diamond and Waterfall Stickles to the stars and matted him as shown.
Pretty simple card and I got to practice coloring in the lines! :)
Thanks for looking!

Friday, October 29, 2010

More Stampscapes!


Still playing with my Stampscapes stamps. I was practicing doing backgrounds by dragging my Clearsnap Stylus wand across the paper. I'm pretty happy with how this one turned out. I do have a few backgrounds destined for the recycling bin however! :)
I used lots of inks for this background. From Ranger (dye) Denim, Stonewashed, Sailboat, Raspberry, Cloudy Blue & Cool Peri. From Hero Arts: Shadow Ink Soft Pool. From Tsukineko: Versamagic Cloud White.
The scene is done on white glossy cardstock, mounting cardstock is by Bazzill.
Stamps by Stampscapes (lakeside cove & pine tree).
Thanks for looking!

Wednesday, October 27, 2010

Sometimes the best cards...


come out of the funniest places! I did an alcohol ink demo for a couple of customers last weekend. After they left I saw the inked piece of glossy cardstock sitting on the table and figured I should do something with it. A few customers have been asking if alcohol inks can be used with Stampscapes stamps. I have heard they can be but had not done it myself. I figured I might as well give it a try. Here is the result! I'm very pleased with it and it took me all of 15 minutes to make. Gotta love that!
I used my Ranger Non-stick craft sheet with Pesto and Stonewash alcohol inks along with Ranger's blending solution. If you see the card in person you will see there seems to have been a bit of gold and butterscotch alcohol inks left on my craft sheet from a previous project that also got blended in.
Stamps by Stampscapes and Impression Obsession (sentiment).
Papers: White glossy cardstock and Bazzil.
Thanks for looking!

Wednesday, October 13, 2010

My fav holly chickadee again


I believe I have used this stamp a few years ago on this blog and in fact I sold this stamp at the Crafty Capers garage sale! I was rooting around my scrap bin and found a few of the chickadees leftover from whichever year it was I sent this image out.


I just received some Impression Obsession Shake It pouches and wanted to try them out. The premise of the pouches is to make shaker cards easier to make by giving you, the cardmaker a premade shape to put your beads, glitter etc in. I like shaker cards but they can be a pain if you make your own shape especially if you are using very tiny beads. Speaking from experience here!!

So I laid the plastic square on my colored image and traced out the shape on the cardstock then cut it out. I laid the pouch on my table added some mini beads into the shape then pulled the protective backing off the back of the pouch and adhered my image on the back of the pouch. I used a square Spellbinder to cut a window in my decorative cardstock and put the pouch in behind the decorative paper. I've taken 2 photos of the card so hopefully you can see what I am talking about. It is difficult to photograph with the plastic on the front.
I made a cool shaker card with a Stampscape stamp as well today but you will have to come into the store to see that one!
Thanks for looking!
Recipe:
Stamp: Impression Obsession Holly Chickadee
Paper: My Mind's Eye and Bazzill
Other: mini beads and pencil crayons


Tuesday, September 28, 2010

Stampscapes!


I spent a pleasant Saturday afternoon this past weekend doing Stampscape demos for a few people who had popped into the store.
This scene is where I am going to retire just me, my husband and my multitude of pets!
Thanks to Shirley, Louise and Angela for getting me practicing my Stampscapes!
We have 2 Winterscapes classes coming up Friday Oct 15 10 am - noon. Cost $27
Saturday Nov 13 1:00 - 3:00 pm. Cost $27
if you would like to learn how to make winter Stampscape scenes. Spaces are limited in these classes.
Stamps: Stampscapes and Art Impressions
Inks: Ranger Adirondack dye inks
Thanks for looking!

Thursday, September 2, 2010

A Bouquet for you


I thought I would take a break from all the Christmas cards I've been making lately to make a summer-ish card. The main image is a "slap stick" stamp by Penny Black that I bought a few months back but had not used.
I colored the cat with my Prisma Pencil crayons. The designer paper is by Basic Grey, ribbon from Crafty Capers, cardstock is from Bazzil.
Thanks for looking!

Saturday, August 21, 2010

Celebrate!


This card was actually a combination of my playing with a few techniques. I am on a bit of a brayering kick right now so the orange background was done on white glossy cardstock and Ardirondack dye inks. I then got it into my head to try another technique I'd heard of using stencils. I taped my Dreamweaver stencil over the brayered background and applied a light colored ink through the holes of the stencil. I removed the stencil and began applying clear drying glue onto the inked areas where the stencil had been. I added Glitter Ritz as I went along being sure to make sure I worked with the dark glitter colors first since they can contaminate the lighter glitter colors. This took a bit of time but I am very please with the results!! I finished the card off by adding 2 orange strips of cardstock embossed with Cuttlebug's Number Collage folder since I was making this card as an 83rd birthday card I made sure 1 strip had an 8 in it and the other a 3. I highlighted those numbers with my Tombow white gel pen. I added a Happy Birthday sentiment at the bottome of the card.
Thanks for looking!
Card Recipe:
Stencil: Dreamweaver Fireworks
Paper: Cordinations and Bazzil
Glitter: Glitter Ritz Fire Engine Red, Stardust, Yellow, Light Copper, Kiwi
Stamp: Stampendous Happy Bday clear set
Other: Memento Tangello ink for sentiment, Cuttlebug Number Collage folder, Tombow White Gel pen.

Thursday, August 19, 2010

Cherish today

I thought I would do something a little out of my usual for this card. I did the Tombow Techniques Certification a while back and thought I would try some of the techniques I learned.
This technique involves stamping a stamp in a light color on vellum then going over the stamped image with a white gel pen, I used Tombow white gel pen, of course. Once that is one turn your vellum over (so the ink is touching your table) and coloring the back side of the vellum with Tombow Markers and your Blender pen. It makes for a very soft look.
I wanted a soft looking sentiment so I stamped it on my main cardstock and placed the vellum over top of it to soften it. I added Hero Arts Pearls on the right side of the vellum. If anyone has questions about this technique don't hesitate to leave a comment and I will answer them as best I can!
Thanks for looking!
Card Recipe:
Stamps: Stampendous Flower and Sentiment
Paper: Platinum Vellum The Paper Cut, Bazzill
Tombow: Markers: 727, 606, 925, 679,
025 & N00 (blender), gel pen
Other: Hero Arts Pearls, Adirondack Earthtones Pitch Black, Memories Yellow dye ink

Wednesday, August 18, 2010

Leafy goodness


Sorry for the lack of posts recently. I have made a few cards but have not had time to get them posted on the blog. I've been trying to do summery things while we have good weather!!
This is a card I made a few weeks back. Crafty Capers received an order from a good Canadian company, Magenta a few weeks ago and I thought I would pull out a Magenta stamp I had in my stash and have a play!
This stamp is acually a swirly leaf stamp but for this card I cut off all the swirlies.
I began by stamping and embossing the leaves with gold embossing powder - 5 on white cardstock and 6 on light green cardstock. I colored the white leaves with my Tombow markers and my Tombow white gel pen. I then cut them out. I used my Tombow glue pen on the green leaves and added yellow and grasshopper Glitter Ritz glitter to them in stripes then cut them out. The joy of using a glue pen on projects like this, instead of a product like Stickles is that the glue pen dries in only a few minutes so there is no waiting around to finish a project! Love that!
The actual card has a slightly different fold than the usual in that the front of the card is actually only 2 inches wide. The lone leaf you see off to the right side of the card is actually on the inside of the card. I assembled everything as shown and added a sentiment.
Thanks for looking!
Card Recipe:
Stamps: Leaf Magenta Rubber Stamps, Sentiment Penny Black
Paper: Bazzill
Tombow: Markers, White gel pen and Glue Pen
Glitter: Glitter Ritz Yellow and Grasshoper

Thursday, August 5, 2010

Doing Distress


This card was supposed to be for Glenda's hardware challenge but I was having a heck of a time trying to incorporate the 1 token piece of hardware onto a card!

Anyway I had pulled out my Distress inks while trying to come up with a plan. I finally decided to scrap the plan of using hardware and work on a Distress ink card instead.

I began this card with a piece of Cathie Allen 130lb white cardstock. I then clear embossed the swirly design a few times. I then applied Milled Lavender, Tea Dye and Old Paper inks all over the white cardstock including over the embossed images. This technique leaves the embossed areas the original paper color and then rest the ink colors. I stamped the flower and sentiment with Adirondack Earthtones Espresso ink. I sanded the edges of the panel to make the piece a little more distressed then matted everything as shown. I added 1 button from my button box to finish things off.

I had a very cute shopper in the store today and thought I would share a few photos. Maureen (Momma) and Mia have given me a serious case of puppy envy!
Card Recipe:
Stamps: Hero Arts Antique Engravings, Hero Arts Speckled Ornaments, Penny Black Dreams come true

Inks: Ranger Distress inks Milled Lavender, Tea Dye & Old Paper, Adirondack Earth tones Espresso

Cardstock: Bazzill and My Minds Eye

Wednesday, July 28, 2010

Dancing for Joy!

Just a quick store update we have received orders from Magenta stamps and sticks as well as A Muse this week. We also now have back in stock the ever popular Ranger Mini Misters. Now onto the regularly scheduled program...
My neighbour and Wednesday carpooling buddy retired last week so I figured a 'happy retirement" card was in order.
I rooted through my stamps and found this one by Penny Black that I have had at least a year and I have never stamped yet! I love these guys I figured it had the right sort of feel.
I began by stamping the image on on white smooth cardstock then I colored the image with my Prismacolor pencil crayons. I matted the image as shown and added some green rhinestone flowers I've also had a while. I stamped the first line of the sentiment on a scrap of yellow cardstock and matted it as shown and stamped the rest of the sentiment inside. The full sentiment reads "the joy of retirement is having nothing to do and all day to do it" I love it! I add some interest to the card I added black and white Fun Flock to the cow and sheep. I also added Ranger's Glossy accents to the beads on the pig's necklace and the sheep's eyes. Thanks for looking!
Card Recipe:
Stamps: Penny Black "the sensations", Impression Obsession "joy of retirement"
Ink: Ranger Archival black
Coloring: Prismacolor pencil crayons
Paper: Bazzill and My Mind's Eye
Other: Stampendous Black and White Fun Flock, Ranger Glossy Accents, Kaiser Flower Rhinestones


Friday, July 16, 2010

Upcoming Classes


Sorry for the lack of posts this week. I've been madly creating make and takes all week (and teaching them as well). Tomorrow is the last Free A*Muse*Apalooza card make and take. Drop in anytime between 10:30 am - 4:00 pm with your adhesive and scissors in hand! We will be using some of A Muse's brand new Christmas stamps only a few stores in BC have these stamps in stock!
Glenda (from A Muse) will be up this weekend to teach her Holiday Headstart class. We have a few spaces left if you are interested in attending. The class is Sunday 10:30 - 12:30. Cost is $27. Please phone Crafty Capers to register 250-585-0022.
Crafty Capers Chirstmas in July classes are being offered every Tuesday this month. Class starts at 6:00 pm. Cost is $15 (including taxes). You will make 4 cards (of 2 designs). Preregistration required.
I'll be back next week posting some of the A Muse make and takes from this week!
Thanks for stopping by!

Thursday, July 1, 2010

Happy Canada Day!

Well I hope everyone had a happy Canada Day. I spent the day updating the computer system for the HST that took effect today (boo, boo!) then we had a BBQ at my parents.
Marie Bowning from Tombow was teaching at the store last weekend. I was not even in the classes but I was given "homework" to remake some of the Tombow Tangles demo cards. I was practicing my strokes on a scrap piece of paper when I noticed all my tear drop shapes were kind of looking like the tail of a kite that got me totally off the topic of my homework, just like when I was in academic school!! :)
Anyway, this card was really fun to make! I cut out 2 kites out of scraps in my scrap bin and used a black Tombow marker to draw lines on them. I had some My Mind's Eye cloud paper in the store so used that as my background. I planned where my kites were going then drew squiggly lines with a brown Tombow marker then made different colored tear drop shapes down the tail - easy peasy! A quick and very summery card now if only summer would get to my part of the world.
Thanks for looking. Oh, and my homework will be done soon, honest! :)
Card Recipe:
Tombow markers: 195, 528, 665, 815, 946, 969, 993 & N25
Papers: Bazzil (solid colors), My Mind's Eye Quite Contrary (clouds), Upsy Daisy (yellow kite) & Basic Grey (red kite)
Other: Hero Arts white pearls

Tuesday, June 29, 2010

A Manly card


Well as promised I am, finally, getting around to posting another "manly" greeting card.
This card was super quick to make and used limited supplies as well!
I began by cutting a square hole out of a 4.5x5.5 piece of scrap cardstock. I used this as a mask. I placed the mask on the front of a white card and stenciled the green leaves using a Dreamweaver stencil. Once I was happy with the amount of leaves in the square I removed the mask and using my Scor-it board embossed a square around leaves to define the edges a little more.
I then put the stencil back down on the card (now without the mask) and taped it down with low tack tape. I decided to use my new Dreamweaver Glossy Black embossing paste which I applied into the holes of the stencil. I removed the tape and stencil while the paste was still wet. I used some oooold Luminart Primary Pigments (dry pigments similar to Ranger's Perfect Pearls) and sprinkled the pigments onto the wet paste. I let the paste dry overnight then brushed off the extra pigments with a blush brush and a Swiffer cloth.
I finished the card by stamping a sentiment in black ink.
Thanks for looking!
Card Recipe:
Stencil: Dreamweaver LJ846 Maidenhair fern
Inks: Brillance Pearlescent Tyme, Versamagic Green Tea & Ranger Mussel Black dye ink
Stamps: A Muse Happy Birthday Mix
Other: Luminart Primary Pigments, Dreamweaver Black Glossy Embossing Paste & Scor-It board

Friday, June 25, 2010

Changito Picnic!

My father in law's birthday is early next so I have been in "man" card mode for the past day or so. Tomorrow's card is gender neutral as well.
I was thinking about Canada Day and summer fun then saw all my Stampendous Changito monkeys. I thought they would make a good scene together. I don't normally make scenes so thought that would be a good challenge for me.

I began by stamping all the standing monkeys and about 1/3 of the tire swing monkey in the upper right corner on a piece of watercolor paper then colored all the standing monkeys with my Tombow markers and Tombow blender pen (N00). I used a green Tombow marker to fill in more grass around the BBQing Changito along the horizon. I sponged green ink around the monkeys for grass and blue for the sky with some of my inks. To make the grass more interesting I added little dots from my grass colored Tombow marker.
Next, I stamped the tire swing monkey on a scrap of watercolor cardstock and colored him and cut him out. I did not color him on the scene cardstock I just wanted the first partial stamp as a guide where to place him and I didn't want to cut his tail out! I sponged blue inside the tire because I did not want to try to cut that out either!
Stamped the sentiment in the upper left hand corner of the card with black ink. I layered everything as shown. Just wanted to point out that the green gingham is actually a placemat that my husband brought me home when he was in England last with his Dad. We'll see if he notices. :) Thanks for looking!
Card Recipe:
Stamps: Stampendous - Changito tire swing, BBQ, Bubbles, Solo & Bday Messages
Inks: Versafine Onyx black, Adirondack Stonewash, Memento Bamboo Leaves
Tombow: White gel pen (for chef's hat), 192, 249, 847, 856, 885, 977, 992, N65, N89, N95 & N00 (blender).

Tuesday, June 22, 2010

June Make and Take


This Saturday, at Crafty Capers between 10:30 - 1:30, we're having a free card make and take!
I finally had a few minutes to get something made up for the class.
Sooo, if you are interested in making this card, for free, come by Crafty Capers this Saturday.
Thanks for looking!
Stamp used: Stampendous Ranunculus stamp.
Paper: Bazzill and Upsy Daisy pattern paper

Tuesday, June 15, 2010

A bouquet for you!


This one is for you Ann! I was lucky enough to be given a bunch of Penny Black and A Muse stamps by a great Crafty Caper's customer. I've had them a few weeks now I have been dying to play with them, especially the Penny Blacks, of course!
I colored this image on a circle of heavy white cardstock (not watercolor) and then when I was doing the background it went horribly wrong so that version went in the recycling! However while I was sitting there trying to figure out how to make a nice background around the hedgie I saw some leftover Tombow marker scribbles on my plastic sour cream container (aka my palette) and I wondered hmmmm... I cut out another circle with my Spellbinder circles and left it in the Spellbinder die. I spritzed the colors on my palette with water and grabbed a sponge dauber and starting at the edge of my die pulled each of the three colors towards the middle of the circle. Worked like a charm!! I then stamped my hedgie with Onyx Versafine ink and colored him up using the indirect Tombow coloring technique using my trusty palette. I wanted a really colorful designer paper for my background but the store seems a little lacking in the bright designer catagory at the moment so I used my Tombow markers and doodled up my background cardstock. It was quite easy just a bunch of dots, lines and hearts - trust me I am no artist if I can do it you can too! Best of all it matched my colored hedgehog.
I stamped the Happy Birthday (Stampendous) with black Archival ink. I matted the hedgehog image with a bunch of green and pink scraps cut out with my Spellbinder circle/scallop circle dies and assembled the card as shown. I'm pretty happy with how the card turned out very bright and cheery!
Thanks for looking!

Monday, June 14, 2010

NEW Cuttlebug!


Sorry for the lack of posts this past week things have been a little hectic around the store. The 8th annual garage sale has come and gone. I hope everyone is enjoying their new treasures!
Speaking of treasures - Provocraft has finally released their new Cuttlebug folders! We received our first order last Monday and have already had to reorder - twice! Our first reorder should arrive today or tomorrow. As always, the Cuttlebug 4x6 embossing folders are $6.50 and the 5x7 folders are $7.98.
We have also started stocking embossing folders that work in the Cuttlebug by a UK company called Crafts Too. The butterfly folder is proving to be the "hot" one to buy!
We also have sponge daubers back in stock. For those desperately in need of them.
Thanks for stopping by. I should have a card to post for you all tomorrow! :)

Monday, June 7, 2010

Micey Nice!


I purchesed the Penny Black clear set "Micey Nice" two weeks ago and have slowly been working on this card since then.

The card is fairly simple. The mice were colored with my Tombow markers, watercolor paper and Tombow blender pen.

Cut out shapes are Spellbinder Nestabilities. All stamped images are by Penny Black.

Designer paper is by Basic Grey.
Thanks for looking!

Saturday, June 5, 2010

Biking along!


This bike stamp by Hero Arts is so cute and so springy not that it seems at all springy here on the west coast at the moment!
This image makes a fairly quick card since there is not much to color except the flowers in the basket. You can't tell very well in this photo but I stamped the basket a second time on a scrap of cardstock, colored them, cut them out (roughly) then popped it on top of the original, uncolored, image.
I used my Tombow markers to add a border around the bike. I also used the markers to draw some flowers in the right corner as well as the dragonflies. The sentiment is by Hero Arts.
Cardstock is by Bo Bunny (double dot) and Bazzill.
Pearls by Hero Arts
Thanks for looking!
Don't forget the Crafty Capers garage sale tomorrow!

Thursday, June 3, 2010

Hugs!


I have a friend who's little girl has been hospitalized with pneumonia. She is making progress but I though her and her mom could use a little cheer so I whipped this card up.
It's pretty straight forward the main image is by Stampabilities colored with Tombow markers on watercolor paper with a Tombow blender ben. The pattern paper is by Basic Grey. I added a border of Tombow dots and swirls around the edge. The solid cardstock is by Bazzill. The sentiment is by Hero Arts.
Thanks for looking!

Wednesday, June 2, 2010

Enjoy!

The clear "enjoy" set by Penny Black came back in stock late last week and I had a chance to play with it today. I was reading about the "blackboard technique" recently and thought this particular set would be perfect for the technique and would make me finally give the technique a try!

I started by finding a scrap of black cardstock in my stash and I stamped the birds image with Cloud Versamagic pigment ink on the black. I LOVE the Versamagic white because it actually shows up on dark cardstock unlike many other white inks.

After the ink was dry I pulled out my watercolor pencil crayons and colored over top of the white ink because the base color is light the pencils show up perfectly on the black cardstock! Amazing! I used my Tombow white gel pen to add the eyes of the birds.

After quite a bit of playing around with the layout I found one I liked but I did not like the solid white Bazzill bling I had chosen as my top layer. I thought the card had an Asian feel so I decided to use my Tombow markers to "draw" some bamboo on the white to jazz it up a bit. It turned out perfect!

I finished off the card by using my Tombow tape runner to lay a line of adhesive down which I used to adhere some gold leafing to the card.

Thanks for looking! Just a reminder, Crafty Capers is having their 8th annual garage sale this Sunday June 6 10:30 - 1:30. Hope to see you there!


Friday, May 28, 2010

May Make and Take


I am off for the next few days but I managed to get a sneak peak of the Make and Take for tomorrow.
Wanna make this card? Drop by Crafty Capers anytime tomorrow between 10:30 - 12:30 with your adhesive and scissors and make this card FREE!
Have a good weekend everyone!

Thursday, May 27, 2010

Stars in the Sky


Here is another sympathy card I made during my sympathy card marathon.
I started by embossing the daisy (Impression Obesession) 3 times with clear embossing powder on white cardstock. I sponged Ranger's latte, stonewashed and espresso dye inks all over the cardstock.
I then placed a scrap of text weight paper over top of the ink and embossing and ironed over the cardstock until the embossing powder was melted off. It left a nice greasy mark on the scrap of text weight paper but it was gone off the original cardstock!
I then stamped the sentiment (Impression Obesession) with Ranger's Black Archival ink. I then matted the piece on scraps from my large scrap bin! The ribbon was also a mystery piece from my embellishment tote.
Thanks for looking.
Don't forget Make and Take May this Saturday 10:30 - 12:30 Free!

Sunday, May 23, 2010

May Make and Take this weekend!

I just wanted to let everyone know that THIS Saturday is Crafty Capers May make and take Saturday. Drop in anytime between 10:30 - 12:30 for a FREE 1 card make and take. Please bring scissors and adhesive with you to class. No need to preregister just show up!

I was flipping through the Magenta catalogue a few days ago and saw a card made with this main image. Since I own it I figured I would use it.


I stamped the image with green ink on lime green A Muse cardstock then proceeded to color the image with my Prisma pencil crayons.


I matted everything as shown. I don't know if you can see it or not but I stamped a pattern on the navy cardstock to jazz it up a bit.


Thanks for looking!


Card Recipe:


Stamps: Magenta 14437F, C0527


Cardstock: A Muse, Bazzill and misc


Coloring: Prismacolor pencils


Ink: Memento Bamboo

Thursday, May 20, 2010

To tame...


Still in the coloring mood! I pulled out 2 Art Impressions stamps I've had for years in my stash.
I stamped the toucan with my Versafine Sepia ink on watercolor cardstock then colored him with my Tombow markers and blender pen.
I stamped the sentiment also with my Versafine ink, put some Tan Tombow around the border of the stamp and pulled the color inside the box with my blender pen.
I sponged Memento Bamboo ink around the entire panel and as well around my main blue cardstock.
Thanks for looking!
Card Recipe: Art Impressions: Q2231, M2192
Tombow markers: 451, 452, 947, 977, 837, 992, 856, 025, 062, 158 & N00 (blender)
Ink: Versafine Vintage Sepia

Friday, May 14, 2010

Penny Black Saturday Challenge #100!


The fab folks at the Penny Black Saturday Challenge are celebrating their 100th challenge this week.
This week we had a sketch we had to follow using at least 1 Penny Black image or sentiment. Sketches are my favorite especially when you get to use Penny Black products!
This card is fairly straight forward. I colored with Tombow markers on Cathie Allen's Superstock (130lb) using my Tombow blender pen. The second (behind circle) is done with small flowers from the same set as the main image (Penny Black Flower Gallery). The sentiment is also by Penny Black.
Thanks for looking!
Recipe:
Stamps: Penny Black Flower Gallery clear set & Flourish Birthday
Paper: Coordinations, A Muse & Cathie Allen's Superstock
Coloring: Tombow markers and blender pen
Ink: Versafine Onyx black
Other: misc ribbon