Monday, January 31, 2011

Burnished Velvet in 2011


A friend showed me a card done using Glitter Ritz and the burnished velvet and I must admit it is a technique I have not done for at least a year or so. I figured I should pull out my glitter since it has not seen the light of day in a while (OK I lied it actually sits out on my table all the time so it is always in the light).
I began this card by cutting a square of Be Creative tape sheet. I then stuck the tape to a piece of Bazzill cardstock. I then used my trusty craft knife and cut out various rolling lines and applied different colors of Glitter Ritz glitter.
I finished the card by using some Kaisercraft Lilac Avenue die cut elements. I really love these die cut colors lavender, kiwi green and yellow. So beautiful and it finished up the card quickly. I like that too. I managed to make a book mark with some of the other elements and I still have some elements left for more projects! Very economical!
Thanks for stopping by!

Friday, January 28, 2011

Shimmer Card Class


For those looking for something to do tonight (Jan 28)there is still room in tonight's Shimmer card class starting at 6:00 pm. We'll make 4 cards using shimmery paper 1 of which is a Valentine. Contact Crafty Capers at 250-585-0022 if you are interested in registering. Preregistration is required.
Now onto the card. This was supposed to be a Valentine card but morphed into a thinking of you card! I have a friend who was recently diagnosed with lung cancer so I think I will pop this one in the mail to her. She could use a pick me up.
I'm quite pleased with myself this card was made entirely of scraps from my bin and I accidently embossed the hot pink circle with the hearts upside down so had to cut another circle and start again! Watch out the Crafts Too You tiny hearts folder is tricky and it is very easy to emboss the hearts upside down!! lol And if your crafting partners are like mine they don't even show any sympathy when you screw up like that!
The bunny was colored with my Tombow Markers on watercolor paper and the decorative edge of the My Mind's Eye designer paper was done with my 10+year old Fiskar's "wiggly scissors".
Thanks for stopping by. Hope to see you at the class.
Card Recipe:
Stamps: Penny Black Bunny Friends & Hero Arts Find Joy set (clear)
Ink: Versafine Vintage Sepia
Paper: My Mind's Eye, Bazzill
Embossing folder: Crafts Too You tiny hearts
Other: Tombow white gel pen, Fiskar's decorative scissors, Spellbinder circles, American Crafts ribbon, Bazzill brad, Prima Flowers

Tuesday, January 25, 2011

You mean so much to me


Still playing around with Valentines. I really love the red/pink color combo and nothing says Valentines more than red and pink! I like how this card turned out - fairly simple and not to frilly. I think this card could even be used as a thank you.
The construction of the card is pretty straight forward. Stamped the damask image with red ink on a strip of cardstock just the perfect size with no cutting from my scraps same with the pink mat. Now if that is not saying this was meant to be I don't know what is! lol I added Ranger's Liquid Pearls (similar to Stickles glitter glue but pearly) to the image as well.
I punched the heart out of a scrap and then stamped the damask stamp on it.
You can't see it in this photo but I also used my Sakura Stardust pen to outline the words for an extra bit of sparkle.
Thanks for stopping by today.
Card Recipe:
Stamps: Hero Arts Speckled Ornaments (Clear), Find Joy (Clear)
Punch: Punch Bunch medium heart
Inks: Brillance Rocket Red, Versamagic Pink Petunia, Versafine Onyx Black
Paper: Bazzill & A Muse cranberry notecards
Other: Sakura Stardust Clear pen, Liquid Pearls Petal Pink & Red

Monday, January 24, 2011

A Flowery Valentine


Well it is nearing the end of January (what the heck has happened to Jan??) so thought it was appropriate to start playing with Valentine cards and images.
I thought I would try something that was not too frilly maybe something suitable for a man.
I pulled out this new 2011 Hero Arts clear set and set to work. I am STILL having problems with my eye so thought I would try something that did not involving coloring but I wanted something bright and cheery. I stamped the flowers on a scrap of red cardstock with black ink then took a white Prisma pencil crayon and highlighted some areas with it to make the flowers pop then cut them out. I then stamped the leaves on a scrap of green with black ink. I also applied some green pencil crayon to these but it's hard to tell in this photo. I cut the leaves out as well. I attached everything as shown.
Thanks for looking and hope it provides some inpiration.
Card Recipe:
Stamps: Hero Arts Blossom Art set, A Muse Happy Valentines Day
Ink: Memento Tuxedo Black and Adirondack dye Cranberry
Paper: Bazzill, My Minds Eye
Embellishments: Prisma pencil crayons and A Muse Pretty Pearls

Saturday, January 22, 2011

Just Peachy!


I've had this Flourishes set for a year or so now and I am happy to say this set should be back in stock at Crafty Capers by the end of January! Yeah love Flourishes stamps!
I colored the image with my Tombow Markers and matted with some Spellbinder dies including a newer die called Lacey Square (now in stock at Crafty Capers). Sentiment by Hero Arts.
Thanks for looking!
Card Recipe:
Stamps: Flourishes Peaches and Cherries set & Hero Arts clear sentiment (exact set not known)
Tombow Markers used: 020, 133, 192, 249, 533, 912, 985, 992 & N00
Paper: Bazzill, My Mind's Eye and Watercolor
Spellbinder dies: Classic squares, Lacey Squares & Fancy Tags
Embellishments: Diamond Stickles

Friday, January 21, 2011

Let's Celebrate!


Yippee today is my birthday! Ok maybe not so much wow those numbers are creaping up there!! Yikes!
I made this card a couple of days ago when I was playing with my friend Gail's new brayer. While playing with hers I discovered the reason I could not brayer was because the rubber of my brayer has hardened significantly over the 10 years I have owned it. I guess that means I get a new brayer for my birthday!
I began this card by brayering a green, 2 yellows and a a terra cotta dye ink on a strip of glossy cardstock. I then borrowed my friend Chris' new silhouette stamp and stamped it onto the brayered background. I Cuttlebug embossed just the edges of some orange cardstock and sponged some Terra Cotta ink to the embossed edges and scored around the edges of the embossed area to finish it off. I had a little extra brayered paper so I cut out a circle to put my sentiment on. I matted the card as shown. I added some black dots on the brayered piece with my Adirondack pigment pen to finish the card off. Thanks for looking!
Card Recipe:
Stamps: Hero Arts
Inks: Adirondack dye inks Lettuce, Beach Ball Yellow, Butterscotch, Terra Cotta. Archival Black dye ink
Papers: white glossy card, Bazzill
Embellishments: Hero Arts & Adirondack Pigment Pen

Wednesday, January 19, 2011

Hey Baby!


I don't make baby cards since most of my friends have done that stage but someone I know just had a baby girl (bet you couldn't guess that from the colors I used!!). It's a straight forward card since I made this in a bit of a rush (whoops!). Giraffe stamp by Stampendous & sentiment by A Muse.
Hope it provides you some inspiration. Thanks for looking!

Thursday, January 6, 2011


Just a quick note before we get started to let everyone know the final A Muse stamp order came in yesterday. No more A Muse stamps will be coming into the store so if there is something you have your eye on now is the time to pick it up.
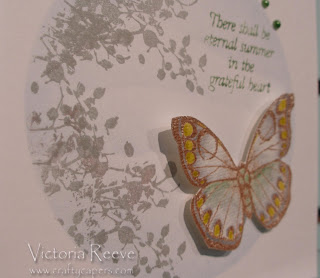
I've been reading the book Winter Garden by Kristin Hannah and I love the cover. It inspired me to make a card based on it! I began by stamping the butterfly with Versafine Vintage Sepia ink and embossing it with clear embossing powder. I then colored it with my Tombow Markers and the Tombow blender pen then cut it out. My friend, Sharron, had discarded a piece of cardstock with a circle cut out of it so I decided to use it as a mask and sponged into the hole (circle) in the cardstock with my Cloudy Blue ink. I left the mask in place and stamped the Berry Branch with grey ink a few times. I removed the mask after this step. I stamped the Flourishes sentiment (there shall be eternal summer in the grateful heart) using a Tombow marker directly on the stamp so everything matched. I mounted the butterfly with double sided foam mounting tape added ribbon and a few Hero Arts pearls and voila - a done card!
BTW I really enjoyed the book and thanks to whoever gave me a Kristen Hannah paperback last summer to read while I recovered from surgery. I'd never read her before!
Thanks for looking!
Card Recipe:
Tombow markers: 026, 158, n45, n55, n95, n00 (blender)
Ink: Versafine Vintage Sepia, Memento London Fog & Ranger Adirondack Lights Cloudy Blue

Stamps: Penny Black Berry Branch (3886J), Hero Arts Antique Engravings (CL383), Flourishes Poppy set for the sentiment
Paper: Bazzill and Watercolor
Other: Hero Arts Foliage Embellishments, Offry ribbon, Crafty Capers clear embossing powder, Spellbinder Standard Circles (for mask) & Ranger Cut N Dry foam to apply ink

Wednesday, January 5, 2011

Sympathy Card - not the best first card of 2011


I hope everyone had a great holiday season! I managed to get 4 days off IN A ROW! I can't remember the last time that happened! I was all excited to get back to the store and make some fun cards as well as some samples for classes then I got the news that a friend's father passed away. That kind of took the wind out of my mojo. :(
Anyway, I managed to get this whipped up. Pretty simple but I don't think a sympathy card is the place to get all jazzy.
I used the new 2011 Hero Arts sympathy set (in the store now) for the sentiment. It's not the most glam set but it sure is good to have a set like this in your stash for quick sympathy cards. The set includes a bunch of sympathy sayings along with a couple of flowers as well so you could get you cards done entirely with 1 set if you wanted.
I am hoping to get some fun cards done today. Stay tuned. Thanks for stopping by!
Card Recipe:
Stamps: Hero Arts With Sympathy set (CL476), Antique Engravings (CL383), Impression Obsession Cover a Card swirls
Paper: Bazzill, A Muse & BoBunny Calipsyo
Ink: Ranger Adirondack Espresso dye, Versamagic Tea Leaves & Brillance Pearlescent Tyme
Other: Spellbinder Labels 1, Cuttlebug Swiss Dot embossing folder, Corner rounder & A Muse ribbon