Sunday, January 31, 2010

Splish Splash!

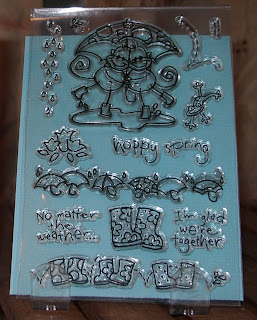
Here is one of the new Stampendous sets I mentioned in the previous post. I so love it! It is especially good for those of us living in the Pacific Northwest!

I started out by stamping the Changitos with my Versafine Onyx black then embossed them with clear embossing powder. I colored the image with my Tombow markers then cut out the image with on of my circle Spellbinder dies. The mats are cut out with scalloped Spellbinder dies.

I am wishing I had Stickles glitter glue and Glossy Accents at home so I could add a little glitter and make the boots glossy.

I am in the process of getting a crafting stash at home so I will need to get those at home.

The new Changito set is now available at Crafty Capers. Thanks for looking!

New Stampendous


I got a sneak peak of the new CHA Stampendous release a few weeks back. As soon as I saw all the new stamps I fell in love! I have been carrying Stampendous for 5 or so years now and I honestly think this is my favourite release EVER! I immediately ordered most of the new images. I am excited to say they arrived last Thursday! I had gall bladder surgery on Thursday and I was so excited to see the new stamps I went into the store today to pick out my favs! I apologize for the poor pictures but I obviously cannot bend as well as I thought I could. :)
I have brought home a few new sets to play with and hope to have a card or two up in the next day or so.

Friday, January 22, 2010

Floating Blossoms


Sorry the blog has not been updated in a while. We've been busy with lots of new orders and classes. My inspiration came from a strip of Basic Grey Origins paper I had on my table left over from my glitter class kits.
I stamped the Floating Blossoms on a scrap of watercolor cardstock with my Versafine ink then I colored the flowers and leaves with my Sakura Glaze pens and my water brush. I let the flowers dry then cut them out. I mounted the scrap of designer paper near the bottom of my card then I cut 2 strips of brown Coredinations cardstock and embossed them with a Cuttlebug folder. Coredinations cardstock has a different "core color" sandwiched between 2 darkers layers to reveal the lighter brown inside the cardstock I lightly sanded the embossed pieces. I mounted everything as shown then Stickled up the flowers with Yellow Stickles for an extra pop!
All supplies shown on this card are available from Crafty Capers.
Just a reminder Crafty Capers is having an open house tomorrow (Jan 23) between 10 am - 3:30 pm. We will have a FREE card make and take between 10:30 am - 2:30 pm. Some items will be on sale as well. We've received 3 orders this week come see what's new!
Recipe:
Stamps: Hero Arts Floating Blossoms
Ink: Versafine Onyx black
Coloring: Sakura Glaze pens
Paper: Basic Grey Origins, Bazzill, Coredinations, watercolor cardstock
Other: Victoria Cuttlebug folder (the best folder in the world!), Yellow Stickles

Thursday, January 7, 2010

Awwww baby!


If you look at the scrapbook page from a few days ago you will notice I took that layout and tweaked it into a card.
I think this is a great layout for smaller stamps.
The card is pretty self explanatory. I colored the images with Prisma pencil crayons and used all scraps from my scrap bin. I used a sponge dauber and edged all the white squares with Stonewash ink.
It's hard to tell in this photo but I used Stampendous Red Fun Flock in the baby buggy for the blanket to make it soft and fluffy!
Recipe:
Stamps: Hero Arts "Awww" and "Tiny Toes", Penny Black "buggy"
Ink: Ranger Stonewash dye ink
Coloring: Prisma pencil crayons and Ranger Diamond Stickles glitter glue
Other: Stampendous Chili Pepper Red Fun Flock, Punch Bunch heart punch

Wednesday, January 6, 2010

Life's Adventures


I managed to get a couple of cards done today even with the big tape and glitter order coming in.
This card was done with Hero Arts stamps. I stamped the frog and mushrooms on white Bazzill cardstock then embossed the images with black embossing powder. I colored each image with my Tombow markers then cut them out. I found a scrap of blue cardstock and stamped the Hero Arts sentiment at the top of the piece with Versamagic Ocean Depth ink then embossed it with Crafty Capers Pixie Dust embossing powder (clear with glitter). I used my Cuttlebug and embossed the lower part of the blue cardstock. To hide my embossed edge I cut a very thin strip of Bo Bunny Love Bandit Stripe cardstock and added it to the top and bottom of my sentiment.
I had scraps of A Muse wood grain cardstock kicking around in my scrap bin and used that for my frog to sit on. I mounted everything as shown.
The decorative edge on the yellow cardstock was cut with my Creatopia. I finished the card by adding Orange Peel and Eucalyptus Stickles. Thanks for looking!
Recipe:
Stamps: Hero arts Essential Messages and Sending Happy Thoughts
Embossing Powder: Crafty Capers Black and Pixie Dust
Cardstock: Bazzill and A Muse
Coloring: Tombow markers
Cuttlebug: Spots and Dots
Other: Clear embossing pad, Versamagic Ocean Depth ink & Stickles glitter glue

Tuesday, January 5, 2010

Bo Bunny Layout


Well, the new Bo Bunny line Love Bandit has inspired me back to scrapbooking! I have even bought supplies for my home so I can scrapbook there since I normally only craft at the store! I'm not sure why but these photos of my sister's wedding (from 2000!!!) grabbed me for these papers. I think part of it was one of her colors was a similar blue to these papers.
Recipe:
Paper: Bo Bunny Love Bandit & Bo Bunny Double Dot Island Mist and Strawberry cardstocks
Die Cuts: alphabet Cuttlebug You're Not the Boss of Me, Spellbinder In Spades border
Stamps: Stampendous Perfectly Clear alphabet (exact one not known), Stampendous Perfectly Clear Wedding Borders
Other: Versafine vintage sepia ink, Doodlebug brads
Thanks for looking! All items are available from Crafty Capers.