I am still playing with the new Sizzix Susan's Garden flower dies. I made another wedding card using the rose die for the store's new window display.
As previously mentioned I used the Sizzix Rose die and I added some shading using a Spun Sugar Distress marker and a water brush. The white frame was cut out using a Spellbinder Radiant Rectangle die.
I stamped a Penny Black Happiness sentiment and embossed it with gold embossing powder then layered the white panel onto a pale green cardstock. I used a strip of gold mirror cardstock, embossed with a Sizzix embossing folder, along the bottom of the card to finish it off.
Hope everyone has a great weekend!
Showing posts with label Spellbinder. Show all posts
Saturday, June 15, 2013
Thursday, April 4, 2013
I blame Joyce...
I had a customer (we'll call her Joyce B) who was mentioning that she was having loads of fun playing with the new Spellbinder 3D embossing folders with mirror paper and Vivadecor 3D stamp paint. I don't own any 3D stamp paint so THAT got me thinking that maybe a Ranger paint dauber would look cool.
I embossed the sea shell Spellbinder 3d embossing folder with some silver glossy cardstock then I used my gold paint dauber (love my paint daubers!!!) and swiped the paint over the raised areas. I tried my best to keep the large shell free of paint. I added a strip of Teresa Colins Far and Away map paper, a black Peel Off sticker, a fussy cut shell from another bit of silver cardstock and some May Arts Jute twine.
Pretty happy with how this turned out. Thanks Joyce (and Cathy C too!) for the inspiration!
I embossed the sea shell Spellbinder 3d embossing folder with some silver glossy cardstock then I used my gold paint dauber (love my paint daubers!!!) and swiped the paint over the raised areas. I tried my best to keep the large shell free of paint. I added a strip of Teresa Colins Far and Away map paper, a black Peel Off sticker, a fussy cut shell from another bit of silver cardstock and some May Arts Jute twine.
Pretty happy with how this turned out. Thanks Joyce (and Cathy C too!) for the inspiration!
Monday, March 25, 2013
Big Shot Class Reject
I have been teaching a Cuttlebug/Big Shot Tips and Tricks class over the past few weeks (2 more classes April 8 & 19 check out the Crafty Capers website if you are interested in registering). This card was not jazzy enough in my mind so did not make the cut so thought I would share. I think the official fold type is called a "swing card" and I made the 1/2 circle with a Spellbinder die! I embellished the circle with some Spellbinder circle mats, a Memory Box butterfly die and a Hero Arts sentiment. Designer paper is by BoBunny Alora collection & Bo Bunny Double Dot cardstock..
I added some Ranger Stickles for some extra bling and to finish off the card.
Saturday, March 23, 2013
Fantastic Birthday
Got a few minutes to play this week. Here is one of the cards I got made.
Fairly simple to do with you own a Big Shot or Cuttlebug. The lacy envelope is a die by Cottage Cutz and will fit a gift card I however, chose to use the envelope as a pocket for my birthday message (sentiment by Hero Arts). The dragonfly is a die by Memory Box called Meadow Dragonfly. The swirl and corner are by Spellbinder. Designer paper is by BoBunny (Alora collection).
Thanks everyone for stopping by!
Fairly simple to do with you own a Big Shot or Cuttlebug. The lacy envelope is a die by Cottage Cutz and will fit a gift card I however, chose to use the envelope as a pocket for my birthday message (sentiment by Hero Arts). The dragonfly is a die by Memory Box called Meadow Dragonfly. The swirl and corner are by Spellbinder. Designer paper is by BoBunny (Alora collection).
Thanks everyone for stopping by!
Saturday, February 2, 2013
Sunny Snowdrops!
I've had my eye on this Flourishes stamp set (Botanical Bookplate Vol 1) because I love snowdrops! I finally "tricked" myself into purchasing the set earlier this week! LOL Not to worry however there are still plenty of sets left for sale at Crafty Capers! :)
I stamped the snowdrop image with Onyx Black Versafine ink on a scrap of kraft cardstock then colored the image with my Prisma pencilcrayons. I used my Spellbinder Classic ovals and Labels 18 to cut out and mat the image. The sentiment is also from the Botanical Bookplate set. I used a Spellbinder M-Bossability folder called "Regal" that I had inked with Aqua Adirondack dye ink. I added some white satin ribbon and some White Liquid Pearls as an accent. I hope to get some more time to play with this set it is so elegant and was very quick to color!
Thanks everyone for stopping by.
I stamped the snowdrop image with Onyx Black Versafine ink on a scrap of kraft cardstock then colored the image with my Prisma pencilcrayons. I used my Spellbinder Classic ovals and Labels 18 to cut out and mat the image. The sentiment is also from the Botanical Bookplate set. I used a Spellbinder M-Bossability folder called "Regal" that I had inked with Aqua Adirondack dye ink. I added some white satin ribbon and some White Liquid Pearls as an accent. I hope to get some more time to play with this set it is so elegant and was very quick to color!
Thanks everyone for stopping by.
Monday, December 24, 2012
Enjoy!
A few weeks ago the fabulous Sheree Taylor brought in some gorgeous poinsettia tags. When saw them I knew I had to try my hand at the poinsettias. Click on the link for some good instructions on how to make these flowers.
I do not own the Tim Holtz tattered poinsettia die so I used my Spellbinder one. I used Distress inks: Fired Brick, Festive Berries, Wild Honey and Gathered Twig. I used my Penny Black script stamp to add some texture to my flower. I finished up my card by using my Spellbinder Labels 18 die plus Expandable Botanical Swirl plus a Sizzix embossing folder with edging in Distress ink (Gathered Twig). The sentiment is by Stampendous, if my memory serves me correctly, which it certainly may not! LOL The card can be seen in real life at the store as it did not get mailed out this year.
Thanks everyone for stopping by!
I do not own the Tim Holtz tattered poinsettia die so I used my Spellbinder one. I used Distress inks: Fired Brick, Festive Berries, Wild Honey and Gathered Twig. I used my Penny Black script stamp to add some texture to my flower. I finished up my card by using my Spellbinder Labels 18 die plus Expandable Botanical Swirl plus a Sizzix embossing folder with edging in Distress ink (Gathered Twig). The sentiment is by Stampendous, if my memory serves me correctly, which it certainly may not! LOL The card can be seen in real life at the store as it did not get mailed out this year.
Thanks everyone for stopping by!
Tuesday, November 13, 2012
Here is another card I got made over the weekend. Quick and easy! Oh and not sure if I mentioned this or not but I bought a Big Shot machine back in September (my Cuttlebug blew up) and I am finding I rarely have to use a metal shim to get "lacy" dies to cut properly! The Big Shot seems to have much more pressure than the Cuttlebug! Love that!
Dies used: Spellbinder Poinsettia & Memory Box Amira Flourish
Embossing Folder: Craft Concept Hexagon Illusions
Stamp by Stampendous embossed in gold.
I added a bit of Hero Arts pink ink to the white poinsettia flower to add a bit of "jazz" and the card was done. Might make a few more of these since they are so quick to make.
Dies used: Spellbinder Poinsettia & Memory Box Amira Flourish
Embossing Folder: Craft Concept Hexagon Illusions
Stamp by Stampendous embossed in gold.
I added a bit of Hero Arts pink ink to the white poinsettia flower to add a bit of "jazz" and the card was done. Might make a few more of these since they are so quick to make.
Friday, October 5, 2012
Happy World Card day!
Tomorrow (Oct 6) is officially World Card Day, traditionally Crafty Capers does a big fund raising event however due to a staff shortage, recovering from the fantastic glitter weekend last weekend and Canadian Thanksgiving we have decided to postpone our usual celebration.
For those who were wondering, Deanna from In the Making (Glitter Ritz and Dees Distinctively dies) was at the store last weekend and it was amazing as usual! We are expecting another shipment of Peel Off stickers, Glitter Ritz and Dees dies early next week.
Here is a card I made before the Deanna arrived but I was having major computer problems so it did not get posted.
To make this card I stamped a Hero Arts Fabulous Flourish stamp with White Versamagic ink on kraft colored cardstock then I made my own glitter paper by putting Be Creative tape on white cardstock then applying Sand Glitter Ritz. I cut out my glitter paper with a Spellbinder Floral Burst die. I stamped a sentiment added some diamond gems to the flourish and the card was done.
I hope everyone has a great World Card Day and Thanksgiving!
For those who were wondering, Deanna from In the Making (Glitter Ritz and Dees Distinctively dies) was at the store last weekend and it was amazing as usual! We are expecting another shipment of Peel Off stickers, Glitter Ritz and Dees dies early next week.
Here is a card I made before the Deanna arrived but I was having major computer problems so it did not get posted.
To make this card I stamped a Hero Arts Fabulous Flourish stamp with White Versamagic ink on kraft colored cardstock then I made my own glitter paper by putting Be Creative tape on white cardstock then applying Sand Glitter Ritz. I cut out my glitter paper with a Spellbinder Floral Burst die. I stamped a sentiment added some diamond gems to the flourish and the card was done.
I hope everyone has a great World Card Day and Thanksgiving!
Monday, September 3, 2012
A little sneak peak...
Brand new Spellbinder dies and Mbossability folders are on their way to Crafty Capers and should arrive this week! Woo hoo!
I managed to get a few of the new dies before they were released and got to work making a card right away! The black lacy frame is a new die set called Fancy Weave and the butterfly (solid and lacy) are from a set called Les Papillions. Both dies are quite intricate so I used waxed paper when I cut them. If you don't know the wax paper trick - take a piece of wax paper, like you use in the kitchen, and make your regular Cuttlebug, Big Shot or Grand Caliber sandwich but place the die on the wax paper then the cardstock then run the die through. If you can leave the wax paper in the die (some dies don't hold the wax paper and that is OK just use a new piece each time you cut. After a while the die may not need wax paper).
Hope everyone is having a great loooong weekend! Thanks to all those teachers out there who do not have a long weekend because they are setting up their classrooms! :)
Also, just a reminder today is a holiday so Crafty Capers is closed so no Coffee & a Card next week Sept 10 is the final week for Coffee and a Card for 2012.
Card Recipe:
Dies: Spellbinder Fancy Weave & Les Papillions (brand new!), Memory Box Gentle Leaf
Stamp: Tim Holtz
Paper: BoBunny (piece with the stamping on), Graphic 45 (green), Bazzill main card, frame, butterfly etc.
I managed to get a few of the new dies before they were released and got to work making a card right away! The black lacy frame is a new die set called Fancy Weave and the butterfly (solid and lacy) are from a set called Les Papillions. Both dies are quite intricate so I used waxed paper when I cut them. If you don't know the wax paper trick - take a piece of wax paper, like you use in the kitchen, and make your regular Cuttlebug, Big Shot or Grand Caliber sandwich but place the die on the wax paper then the cardstock then run the die through. If you can leave the wax paper in the die (some dies don't hold the wax paper and that is OK just use a new piece each time you cut. After a while the die may not need wax paper).
Hope everyone is having a great loooong weekend! Thanks to all those teachers out there who do not have a long weekend because they are setting up their classrooms! :)
Also, just a reminder today is a holiday so Crafty Capers is closed so no Coffee & a Card next week Sept 10 is the final week for Coffee and a Card for 2012.
Card Recipe:
Dies: Spellbinder Fancy Weave & Les Papillions (brand new!), Memory Box Gentle Leaf
Stamp: Tim Holtz
Paper: BoBunny (piece with the stamping on), Graphic 45 (green), Bazzill main card, frame, butterfly etc.
Saturday, August 4, 2012
Happy Birthday Auntie Jerry!
Today is my Great Aunt's birthday. She loves my cards and keeps them in a photo album so I try to send her extra special ones. I am really happy with how this one turned out and it will be worth all the extra postage I know I am going to have to pay to get this card to Surrey. I got this layout idea from Grace
Thanks everyone for stopping by! Have a great long weekend (2 days off in a row for me - yippee)!
Saturday, June 16, 2012
Up, Up and away!
Happy Father's Day!
This week was so crazy that I barely managed to get my Dad's Father's Day card made, and in fact, I had to stay late at work tonight to get it finished!
I began this card by pulling out my stipple brushes and a piece of cardstock from the recycling bin. I ripped the cardstock from the bin to make a ragged line. I placed the ripped edge on a piece of glossy cardstock and stippled Adirondack Latte ink about midway up the glossy card. Once the ink was as dark as I wanted I moved the ripped edge down and then stippled Adirondack Ginger ink (middle color) once I was happy with that I moved the ripped edge even farther down the cardstock and stippled Adirondack Pitch Black ink. I made my sky by stippling Adirondack Aqua and Stonewashed inks along with a bit of Adirondack Pink Sherbet. I grabbed my Stampscapes Pine Tree stamp and stamped it 3 times with my Memories Black ink (dye). I then thought the scene needed a little "something" and grabbed my Hero Arts balloon stamp that was on the table and stamped it with my Memories black ink. I matted the scene with blue and rust cardstock then embossed my main cardstock with a Spellbinder M-Bossability (Flora) that I had inked with Latte ink to match the scene. Once I got down to business the card probably took me 20 minutes.
Happy Father's Day to all the Dads out there!
This week was so crazy that I barely managed to get my Dad's Father's Day card made, and in fact, I had to stay late at work tonight to get it finished!
I began this card by pulling out my stipple brushes and a piece of cardstock from the recycling bin. I ripped the cardstock from the bin to make a ragged line. I placed the ripped edge on a piece of glossy cardstock and stippled Adirondack Latte ink about midway up the glossy card. Once the ink was as dark as I wanted I moved the ripped edge down and then stippled Adirondack Ginger ink (middle color) once I was happy with that I moved the ripped edge even farther down the cardstock and stippled Adirondack Pitch Black ink. I made my sky by stippling Adirondack Aqua and Stonewashed inks along with a bit of Adirondack Pink Sherbet. I grabbed my Stampscapes Pine Tree stamp and stamped it 3 times with my Memories Black ink (dye). I then thought the scene needed a little "something" and grabbed my Hero Arts balloon stamp that was on the table and stamped it with my Memories black ink. I matted the scene with blue and rust cardstock then embossed my main cardstock with a Spellbinder M-Bossability (Flora) that I had inked with Latte ink to match the scene. Once I got down to business the card probably took me 20 minutes.
Happy Father's Day to all the Dads out there!
Friday, May 11, 2012
Alora Hello
So happy with how this card turned out and I managed to use up lots of Bo Bunny paper scraps as well so that makes me extra happy!
I cut out 9 squares of Alora BoBunny cardstock left over from the Alora card class I taught a few weeks back. I mounted them onto a larger green square. I used a couple of Memory Box dies to embellish the card. The blue flower at the lower left of the card was made with the Spellbinder Peony die.
I am quite excited for this weekend as I will be enjoying a very rare Saturday off and will be going to a book sale. I am almost as addicted to books as I am stamps! LOL
Card Recipe:
Cardstock: Bo Bunny Double Dot and Alora
Stamps: sentiment by Stampendous
Dies: Memory Box Vivienne and Darla butterflies, Poppy Stamps Ivy Tendrals die, Spellbinder Classic squares, Peony & Lacy squares
Other: Hero Arts gems and gem flowers & Corner Chomper for corner rounding
I cut out 9 squares of Alora BoBunny cardstock left over from the Alora card class I taught a few weeks back. I mounted them onto a larger green square. I used a couple of Memory Box dies to embellish the card. The blue flower at the lower left of the card was made with the Spellbinder Peony die.
I am quite excited for this weekend as I will be enjoying a very rare Saturday off and will be going to a book sale. I am almost as addicted to books as I am stamps! LOL
Card Recipe:
Cardstock: Bo Bunny Double Dot and Alora
Stamps: sentiment by Stampendous
Dies: Memory Box Vivienne and Darla butterflies, Poppy Stamps Ivy Tendrals die, Spellbinder Classic squares, Peony & Lacy squares
Other: Hero Arts gems and gem flowers & Corner Chomper for corner rounding
Wednesday, May 9, 2012
Birthday card marathon
I have a bunch of birthdays in the next couple of weeks plus Mothers Day this weekend so I am under the gun this week to get my cards done. Here is a card I whipped up for my aunt's 70th birthday this weekend. I actually have 2 cards made for her 1 from me and one from my parents.
I'm pretty happy with how this card turned out. It is pretty straightforward. I cut the lacy flower part 3 times out of 3 colors so I could layer everything.
Card Recipe:
Dies: Memory Box Floral Square & Spellbinder Edgeabilities large scallop
Stamps: Hero Arts Yummy Treats clear set
Other: Hero Arts pearls, May Arts twine and ribbon, Tonic corner punch
Ink: Ranger Archival Coffee die
I'm pretty happy with how this card turned out. It is pretty straightforward. I cut the lacy flower part 3 times out of 3 colors so I could layer everything.
Card Recipe:
Dies: Memory Box Floral Square & Spellbinder Edgeabilities large scallop
Stamps: Hero Arts Yummy Treats clear set
Other: Hero Arts pearls, May Arts twine and ribbon, Tonic corner punch
Ink: Ranger Archival Coffee die
Tuesday, May 8, 2012
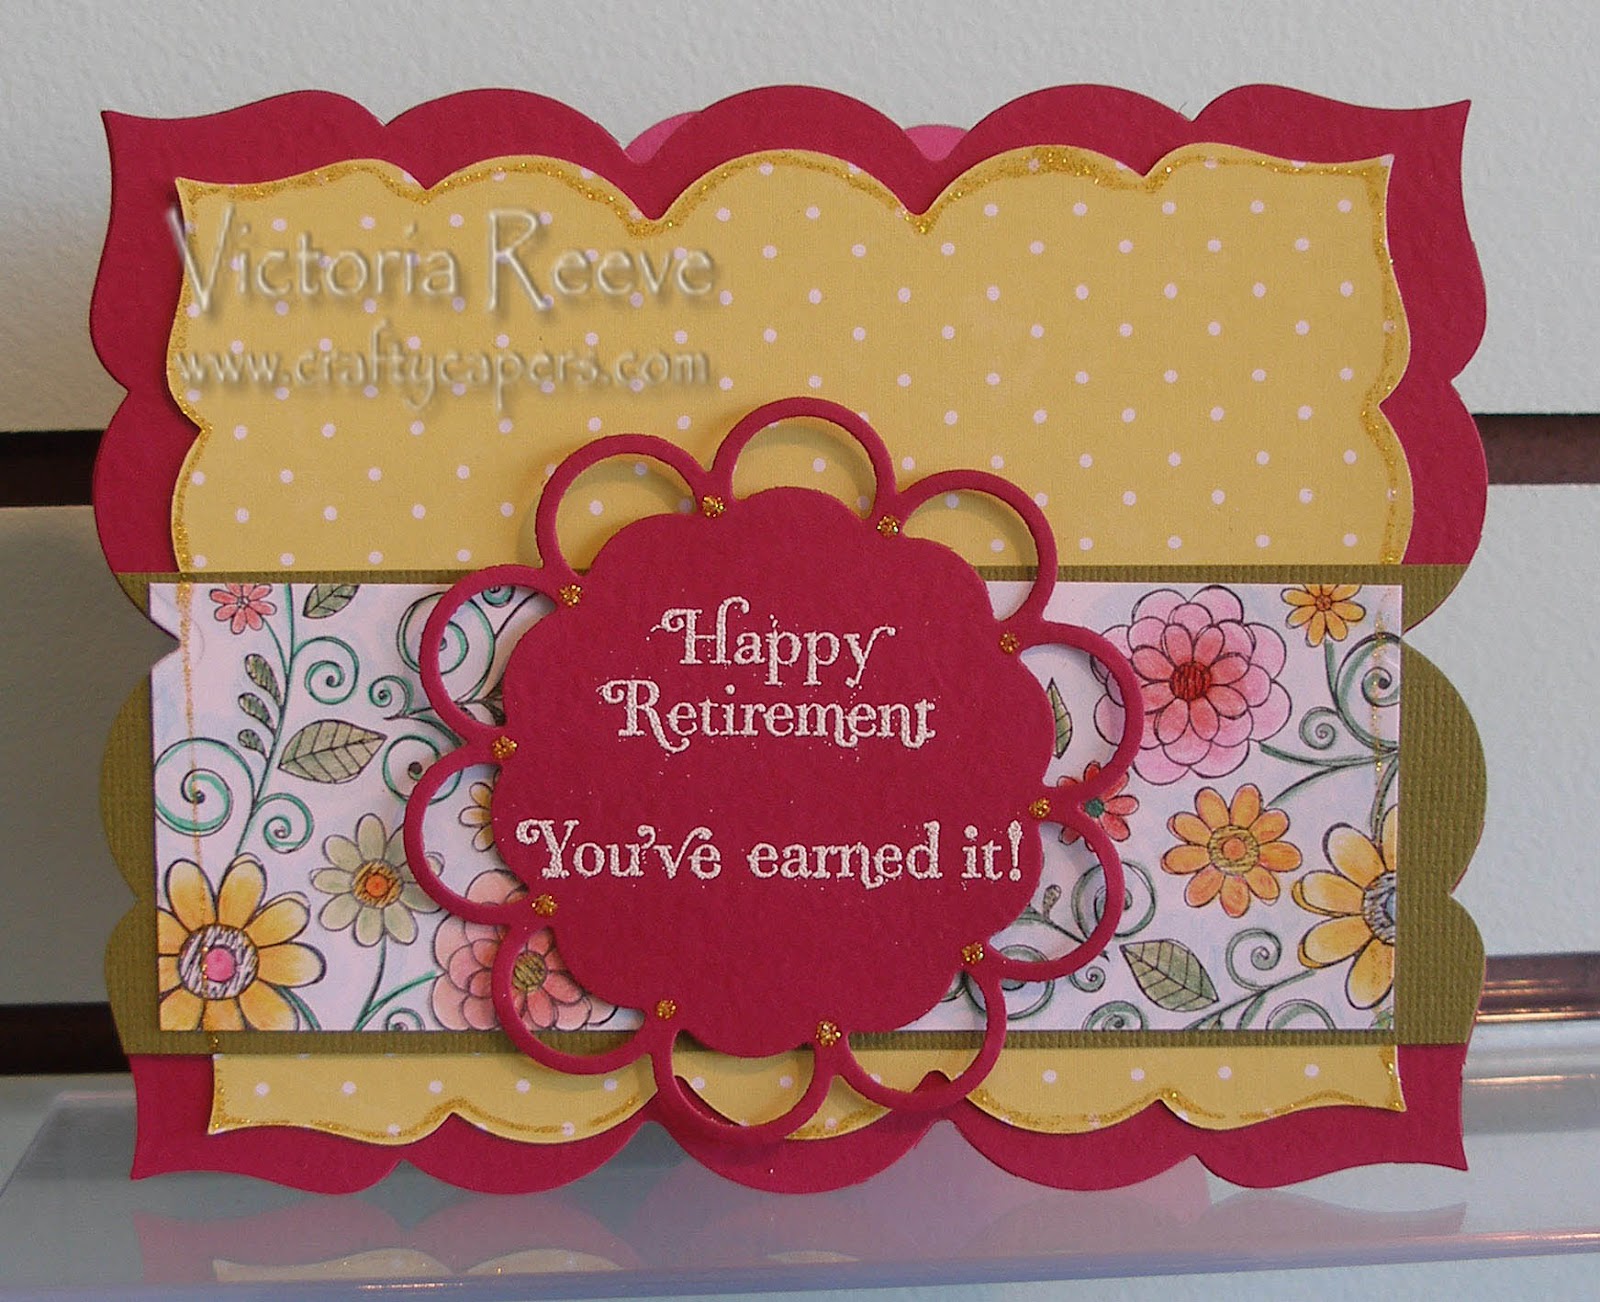
Happy Retirement
The store got in Little Yellow Bicycle's new Hello Spring paper line last week and I could not wait to have a play with it. The colors are so bright and, well, spring like! :) I bought some new Derwent and Prisma pencil crayons last week and used them to color the flower image. I was doing a product test between Derwent and Prisma but could not decide which brand I liked best they were both nice.
The card is pretty straightforward. I used a Spellbinder Grand (larger than regular) Label 23 for the card shape. I should have used my anti static pad for the sentiment because I have stray white embossing powder around the sentiment. I used Yellow Stickles to edge the yellow paper (Little Yellow Bicycle).
Card Recipe:
Stamps: Hero Arts Flowers and Swirls & Impression Obession Happy Retirement
Coloring: Prisma and Derwent pencil crayons
Paper: Bazzil and Little Yellow Bicycle
Spellbinder: Grand Labels 23 & Blossom Tags and Accents
Other: Yellow Stickles & Seafoam White embossing powder
The card is pretty straightforward. I used a Spellbinder Grand (larger than regular) Label 23 for the card shape. I should have used my anti static pad for the sentiment because I have stray white embossing powder around the sentiment. I used Yellow Stickles to edge the yellow paper (Little Yellow Bicycle).
Card Recipe:
Stamps: Hero Arts Flowers and Swirls & Impression Obession Happy Retirement
Coloring: Prisma and Derwent pencil crayons
Paper: Bazzil and Little Yellow Bicycle
Spellbinder: Grand Labels 23 & Blossom Tags and Accents
Other: Yellow Stickles & Seafoam White embossing powder
Monday, April 30, 2012
A little sympathy
Hi All! Hope everyone had a good weekend I spent the weekend working on my income taxes. I HATE doing taxes however I bucked up and now they are done. I should treat myself to a trip to the spa or some such!
I realized last week I have no sympathy cards on hand and I really think they are the type of card that you should have on hand since usually you need the cards in a hurry and often you are not thinking clearly when you need to get one sent out. :(
I'm happy with how this card turned and it was quick! I began by stamping my sentiment with Deep Lagoon Versafine ink on 110lb white cardstock. I realized AFTER stamping it would have been smarter to do my other steps before stamping the sentiment. I then cut out a Spellbinder labels 8 shape to mask over my sentiment here is where I realized that it was very difficult to lay my mask over my saying leaving a even border around it. So take my advice cut your mask, sponge around it then stamp your sentiment! I was lucky and my guessing worked out pretty good (whew!) After my mask wask was in place I used my Stylus wand, a foam tip and Adirondack Stonewashed (dye) ink to apply ink around the outside of my labels shape. I kept the blue color darker around the edges and lighter farther away from the saying. I kept the mask in the place and used a cling flower stamp and Memento Canteloupe and Tangello inks and stamped randonly over my card and over top of the mask. I removed the mask and the area around my sentiment was nice and white. I added some twine around the top of the card and done!
Just wanted to say something about the sentiment on this card. It is from a clear sympathy set from Impression Obsession and I have been saying for years in my opinion it is the BEST sympathy set on the market. Lots of really great, but not too mushy, sympathy sentiments. Crafty Capers has it back in stock if you are looking for such a thing.
Looks like the store will be hopping this week with LOTS of new products coming in. Watch this space for updates!
Also, don't forget Crafty's 9th annual garage sale is coming up quickly! The date is Thursday May 24 (and May begins tomorrow!!!!!) 5:30 - 8:00. If you are interested in putting items in the garage sale please contact the store for details.
Stamps used on this card: Impression Obession clear sympathy set & Hero Arts (cling) Small Solid Flower
I realized last week I have no sympathy cards on hand and I really think they are the type of card that you should have on hand since usually you need the cards in a hurry and often you are not thinking clearly when you need to get one sent out. :(
I'm happy with how this card turned and it was quick! I began by stamping my sentiment with Deep Lagoon Versafine ink on 110lb white cardstock. I realized AFTER stamping it would have been smarter to do my other steps before stamping the sentiment. I then cut out a Spellbinder labels 8 shape to mask over my sentiment here is where I realized that it was very difficult to lay my mask over my saying leaving a even border around it. So take my advice cut your mask, sponge around it then stamp your sentiment! I was lucky and my guessing worked out pretty good (whew!) After my mask wask was in place I used my Stylus wand, a foam tip and Adirondack Stonewashed (dye) ink to apply ink around the outside of my labels shape. I kept the blue color darker around the edges and lighter farther away from the saying. I kept the mask in the place and used a cling flower stamp and Memento Canteloupe and Tangello inks and stamped randonly over my card and over top of the mask. I removed the mask and the area around my sentiment was nice and white. I added some twine around the top of the card and done!
Just wanted to say something about the sentiment on this card. It is from a clear sympathy set from Impression Obsession and I have been saying for years in my opinion it is the BEST sympathy set on the market. Lots of really great, but not too mushy, sympathy sentiments. Crafty Capers has it back in stock if you are looking for such a thing.
Looks like the store will be hopping this week with LOTS of new products coming in. Watch this space for updates!
Also, don't forget Crafty's 9th annual garage sale is coming up quickly! The date is Thursday May 24 (and May begins tomorrow!!!!!) 5:30 - 8:00. If you are interested in putting items in the garage sale please contact the store for details.
Stamps used on this card: Impression Obession clear sympathy set & Hero Arts (cling) Small Solid Flower
Saturday, April 28, 2012
Little Sheep
This sheep idea is certainly not new but most people seem to make them using punches since I traded in most of my punches years ago for Spellbinder dies I thought I would try my hand at making animals using dies. This sheep was made using the sets large scalloped circle, large smooth circle, large smooth oval and the tiniest picot circle all by Spellbinder. I assembled him as shown then added some white Fun Flock by Stampendous plus some googly eyes from the Dollar Store (sorry should have warned my friends since it is VERY rare for me to shop in a dollar store LOL). The background for the sheep is a stamp by Impression Obession called Summer Field and was drawn by Leigh Hannan (love her illustrations!). Thanks to Leslie S for finishing the coloring of this stamp for me when I got gabbing on the phone!
Thanks for stopping by!
Friday, April 27, 2012
Wonderful Mom
Whipped up this card yesterday using my new Hero Arts/Sizzix Stamp and Embossing set called Floral Wreath. Love how it turned out and to be a Mothers Day card so even better since I have a few I have to get made in the next couple of weeks.
I started by stamping the wreath stamp in Seafoam White embossing powder on white cardstock then I used my Stylus handles and sponge tips (I am using these for more than Stampscapes scenes now) and swirled on Hero Arts Soft Blossom ink, Adirondack Pink Sherbet and Raspberry inks over the stamped image. The embossed image resisted the ink so it stayed nice and white. I then cut out the image using a Spellbinder Labels 18 and Classic Oval die. I then took the embossing folder from the Wreath set and embossed the image. Love how it turned out! So beautiful!
I then found a scrap of white cardstock and stamped a Flourishes sentiment in Hero Arts Soft Blossom ink all over the scrap (the sentiment is quite small). I cut a frilly border using my Spellbinder set Fleur di Lis Accents. I punched some Martha Stewart butterflies and added some Hero Arts pearls to finish off the card.
Here is hoping you all have a great weekend.
I started by stamping the wreath stamp in Seafoam White embossing powder on white cardstock then I used my Stylus handles and sponge tips (I am using these for more than Stampscapes scenes now) and swirled on Hero Arts Soft Blossom ink, Adirondack Pink Sherbet and Raspberry inks over the stamped image. The embossed image resisted the ink so it stayed nice and white. I then cut out the image using a Spellbinder Labels 18 and Classic Oval die. I then took the embossing folder from the Wreath set and embossed the image. Love how it turned out! So beautiful!
I then found a scrap of white cardstock and stamped a Flourishes sentiment in Hero Arts Soft Blossom ink all over the scrap (the sentiment is quite small). I cut a frilly border using my Spellbinder set Fleur di Lis Accents. I punched some Martha Stewart butterflies and added some Hero Arts pearls to finish off the card.
Here is hoping you all have a great weekend.
Wednesday, April 25, 2012
Mr. and Mrs.
Another card for the wedding display today. I love the white on white with a touch of blue.
I stamped the sentiments (Just Rite) on a teeny tiny scrap of white cardstock (glad I kept that!) then cut out a mat from the Spellbinder set Twisted Metal Tags and Accents then added another mat with my Spellbinder Fleur di lis squares. I cut out a swirl with my Sizzix die Vine with Leaves then smooshed my Perfect Medium ink pad all over it. I then dusted Pearl Perfect Pearl powder all over the wet ink to add some shimmer to the swirl. I did the same thing with 2 white paper flowers by Hero Arts. I added some Hero Arts rhinestones. I embossed the main cardstock with the Craft Concepts embossing folder.
Hope this card provides some inspiration!
I stamped the sentiments (Just Rite) on a teeny tiny scrap of white cardstock (glad I kept that!) then cut out a mat from the Spellbinder set Twisted Metal Tags and Accents then added another mat with my Spellbinder Fleur di lis squares. I cut out a swirl with my Sizzix die Vine with Leaves then smooshed my Perfect Medium ink pad all over it. I then dusted Pearl Perfect Pearl powder all over the wet ink to add some shimmer to the swirl. I did the same thing with 2 white paper flowers by Hero Arts. I added some Hero Arts rhinestones. I embossed the main cardstock with the Craft Concepts embossing folder.
Hope this card provides some inspiration!
Saturday, April 21, 2012
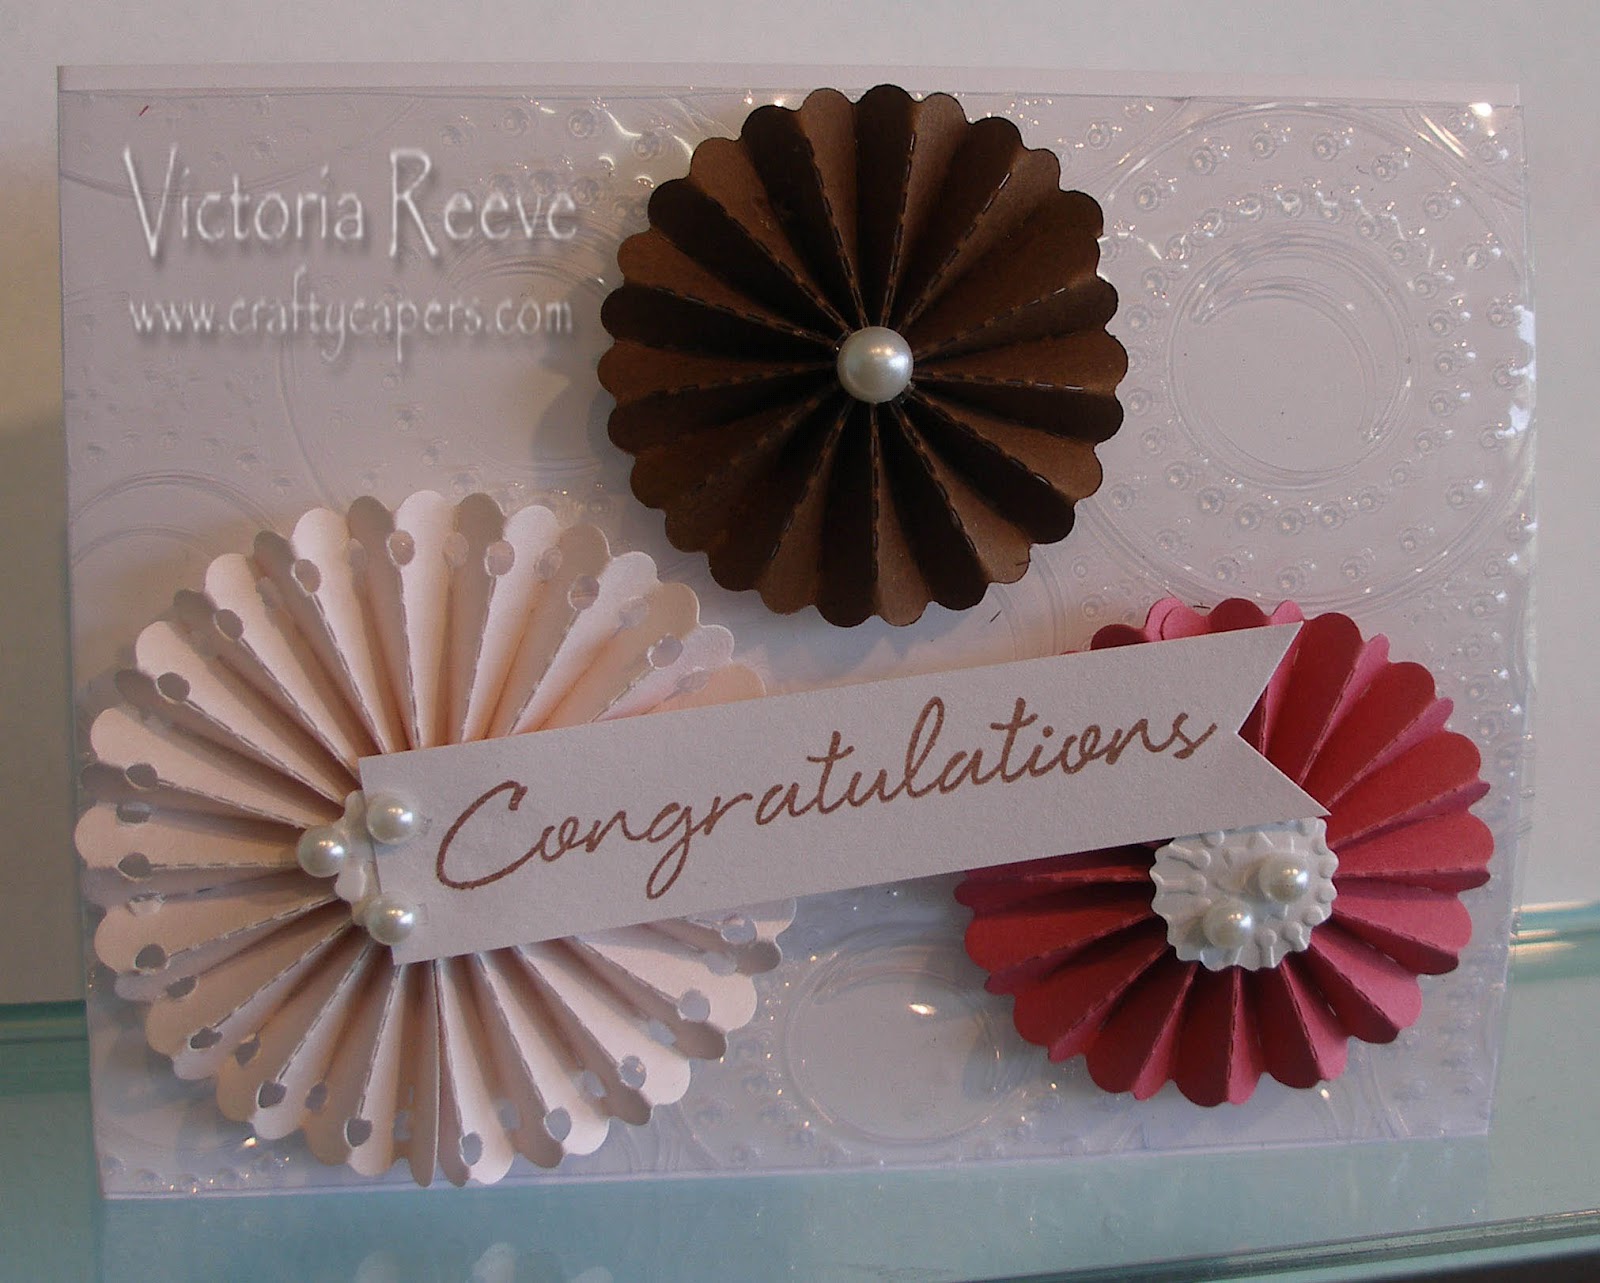
Embossing and Rosettes
I have had the Tim Holtz rosette die for a few months now and decided to put some rosettes on a card. I made 3 rosettes (different sizes) and attached them to a piece of acetate that I ran through my Cuttlebug with a M-Bossibility folder (sorry can't remember the name off the top of my head). I used a Hero Arts sentiment and attached it to the biggest rosette and used some Hero Arts pearls to finish off the card.
Thanks for stopping by!
Monday, April 16, 2012
A country garden
Love how this card turned out! Unfortunately, I believe all the dies I used to make this card are sold out however I will be placing a new Memory Box order shortly so if you neeeed any of these dies contact Crafty Capers to add your name to our list.
The card is fairly straight forward so I will just list the supplies used:
Memory Box dies: picket fence, ivy, wildflower border, kaleidascope butterfly
Spellbinder die: Labels 2
Cardstock: Bo Bunny and Neenah solar white
Stamp: Hero Arts
Other: Versafine Vintage Sepia & Stampendous Fun green Flock
The card is fairly straight forward so I will just list the supplies used:
Memory Box dies: picket fence, ivy, wildflower border, kaleidascope butterfly
Spellbinder die: Labels 2
Cardstock: Bo Bunny and Neenah solar white
Stamp: Hero Arts
Other: Versafine Vintage Sepia & Stampendous Fun green Flock
Subscribe to:
Posts (Atom)