Showing posts with label Sizzix. Show all posts

Tuesday, April 11, 2017

Answering some questions

Back in February, at our Creativation Open House we made this card with a Sizzix die called  Happy Birthday Drop-In Card die that was due out in March.
 The die has been hugely popular but we have had a few questions about how to cut it out so I thought I would do a quick tutorial. Thanks to Sandra H for the idea for this tutorial.

The die looks like this in the package:


It cut the card shape align the dies like this:
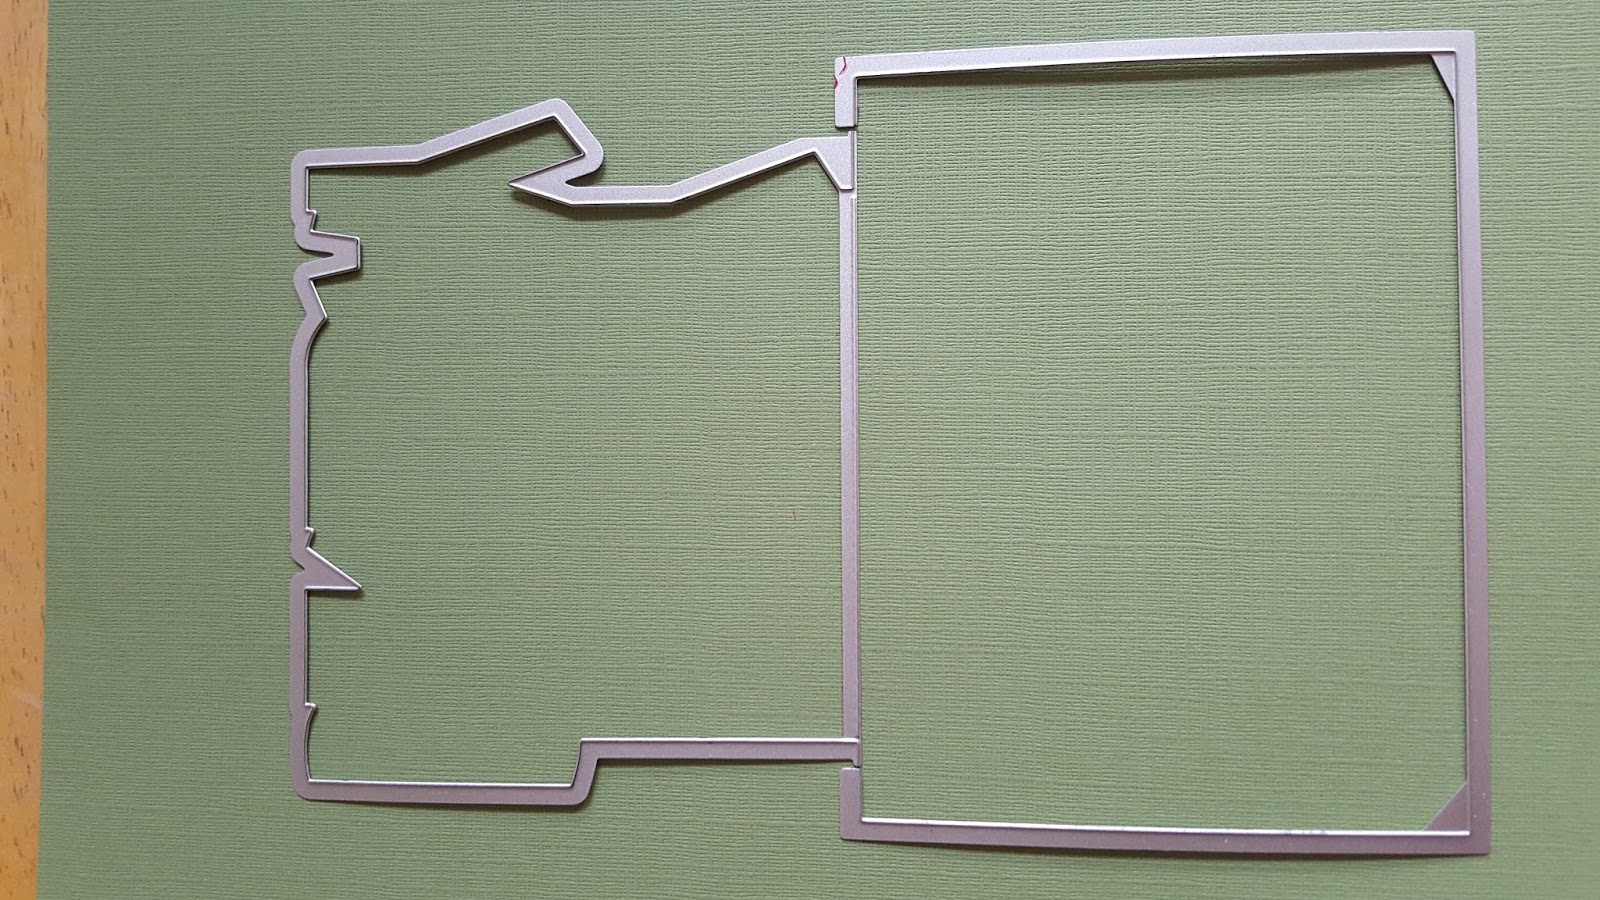
You want to make sure the bumpy side of the die is touching the paper. These photos show it the opposite way. I wanted to show you how the dies should line up but with the cutting part touching the paper! 

 I used my Big Shot Express (electric machine) to cut my shape. LOVE this machine BTW!
After cutting you will have a shape like this:
Cut out the Happy Birthday Die included in the package and you have a super quick card. Hope this helps. Stephanie Barnard has quite a few dies with this sort of design and they all work the same. So if you have already bought the die how are you using it??
Thanks for stopping by.


Friday, May 18, 2012

Ahh naps!

I made this card for no one in particular but it sure was fun to do. I purchased the new Tim Holtz alarm clock die last week and knew I wanted to make a retirement card with it first thing.
I die cut the clock out of black cardstock then stamped the Impression Obession sentiment in the center and embossed it with Crafty Capers Silver Dollar embossing powder. I mounted the clock onto my main cardstock (Hero Arts) then the fun part came! I had to think of things I wanted to do when I retired. I actually had some help from customers Leslie S and Susan M. I stamped out the retirement activities on white cardstock with a Stampendous clear alphabet using my Versafine Onyx black ink then mounted them onto black. I added some blue pearls to the clock face and the card was done. It was quick to do and fun. Hope everyone is having a great start to the long weekend!
If you are looking for something to do tomorrow morning (10:30 - 12:30) Crafty Capers is having a $2.00 make and take. No need to preregister just drop in with your adhesives, scissors and glue pen (if you own one).

Monday, May 14, 2012

A card for my Mom

I could not post this Mothers Day card until after the day because my Mom reads my blog. Would not want to ruin the surprise!
This card is pretty simple. I used the Tim Holtz die Tattered Florals and used Worn Lipstick and Fired Brick Distress ink pads to color the flower using the wrinkle free distress technique. Love the color the flower turned out!!! I debated using my Distress markers but am glad I decided against it for this project.
I used to embossing folders (Crafts too You and Spellbinder) for the cream background. I stamped my Flourshes sentiments on, you guessed it, Bo Bunny Double dot cardstock! I added some fake pearls using Ranger's Liquid Pearls Petal Pink for the center of the flower and the left side of the Double Dot cardstock.
Happy Mother's Day Mom!

Wednesday, April 25, 2012

Mr. and Mrs.

Another card for the wedding display today. I love the white on white with a touch of blue.
I stamped the sentiments (Just Rite) on a teeny tiny scrap of white cardstock (glad I kept that!) then cut out a mat from the Spellbinder set Twisted Metal Tags and Accents then added another mat with my Spellbinder Fleur di lis squares. I cut out a swirl with my Sizzix die Vine with Leaves then smooshed my Perfect Medium ink pad all over it. I then dusted Pearl Perfect Pearl powder all over the wet ink to add some shimmer to the swirl. I did the same thing with 2 white paper flowers by Hero Arts. I added some Hero Arts rhinestones. I embossed the main cardstock with the Craft Concepts embossing folder.
Hope this card provides some inspiration!

Monday, March 19, 2012

Window Display

I've been madly making spring type cards for the store window over the past few weeks to go with fabulous paper bouquet I posted last week. Here is one of the cards I have created.
I made the roses with a Sizzix die using Coredinations cardstock and wool felt. I love the Sizzix dies because they cut through thicker materials like felt like butter! Love it!
I used a Craft Concepts embossing folder on the green circle and matched it with a Spellbinder Scalloped circle. The pattern paper is the Alora line by BoBunny with some Turquoise Bo Bunny Double dot cardstock. The solid green cardstock is Coredinations. Sentiment and pearls by Hero Arts.
Thanks for stopping by!

Sunday, January 29, 2012

Krafty card

I got some inspiration for this card I saw in a Paper Crafts magazine. One of the cards was this shape. Love it so I pulled out my Spellbinder Labels 8 dies to make my main card as well as the mat layer. I stamped the Hero Arts Large Fabric Background stamp (love this stamp!) with Versamark ink and Ranger Seafoam white embossing powder. I added some Offray ribbon, a rose I made with a Sizzix die and a Hero Arts sentiment from the Say it All clear set. I added a Hero Arts gem to the middle of my rose for a bit of extra bling. I like this card shape so much I might have to make some more along this line! Hope everyone is having a good weekend!

Wednesday, January 25, 2012

Leftover Valentine

I had a piece of Be Creative tape with heart shaped holes cut out of it leftover from the card yesterday so me being the thrifty gal that I am challenged myself to use it. I found some pattern paper bits that were in the same color family so I cut out 6 Sizzix hearts and matted them as shown. I used Cinnamon Glitter Ritz glitter on my leftover piece. I used a scap of cream behind the heart holes that I had stamped XOX sentiment from the Hero Arts set Say It All (stamped with Ranger Adirondack dye Red Pepper ink). The rest is pretty straight forward. The scallop edge is from a Spellbinder die. Pearls and lace from Hero Arts. I finished off the card by adding some faux stitching through the layered hearts with my Sakura Stardust pen.
Thanks for stopping by!

Saturday, November 26, 2011

Fabulous Birthday

One of my sister's is having a birthday in the next few days. We are having the family party tomorrow evening so I had to come up with a card for her somehow I got off an a completely different track and ended up making a very cute little gift card box instead. LOL. Thankfully, I had already decided to get her a gift card so I didn't have to rethink my gift since I had already sent my hubby out for it since I am still not particularly mobile due to my ankle. The colors in this picture are a bit off trust me everything matches.
I bought a new Sizzix die this week called Scoreboard XL die Business Card box and decided to pull it out of the package! I discovered that this die works best with thicker paper I'd say 100lb or thicker, of course, I did not have any handy except boring old white so I glued to sheets of 65lb together. The patterned paper is by DCWV and is from an old 8x8 pack the inside of the box is Coredinations cardstock. I decorated the front of the box with a small frame from the Just Rite Stampers set "You Inspire Me". The inside sentiment is from the same set. I pulled out another new Sizzix die as well for this project the 3D Flower die. I used it to cut some wool felt to make a rolled rose. Love how that turned out! I could not find my velcro to use as a fastener for the box so settled for some ribbon from my stash. Thanks for stopping by!

Wednesday, November 9, 2011

Christmas card using scraps

Most of this card was done using up old patterned paper I'm pretty happy about that. I'm so happy with this card that I actually cut out enough parts to make 3 cards I just need to finish assembling them. The card is fairly straightforward. The trees are cut from a Sizzix/Hero Arts stamp and die cut set. The houndstooth circle was cut with a Spellbinder standard circle. I used Spellbinder Picot circles as a mat for the smooth circle. The embossing folder used is by Cuttlebug (D'vine swirl).
The embellishments on the trees are Petal Pink Liquid Pearls. Sentiment by Penny Black (of course, LOL).

Wednesday, October 5, 2011

Tree Trifold

I wanted to take a moment to thank everyone who came by the store last Saturday for our World Card Day fundraiser for Nanaimo's Food Bank. It was a very successful day. Thank you.
I managed to get a few minutes to play yesterday and decided to pull out my newer Hero Arts/Sizzix Stamp and Die Cut Reindeer set. Unlike the first time I played with the set I decided to go with a more elegant look and use the trees in the set. I heat embossed the trees a few times then cut them out with the matching die. I ripped my 2 front panels of the card so it would look like snowy hills. I edged the ripped edge with Brillance Sky blue ink. The sentiment is by Hero Arts. Hope this provides you with some inspiration.

Friday, July 22, 2011

Burnished Velvet Sizzix style

I managed a few minutes to play with the Sizzix Ink It plates with Be Creative tape and Glitter Ritz this week. Love how it turned out! More subtle than the Fun Flock but still lovely. I cut out a frame with my Spellbinder Labels 1 and Classic Ovals then applied some Be Creative tape over the whole thing and added Mystique glitter from the limited edition Mardi Gras glitter pack. Then I pulled out my Sizzix Ink It plate and applied Versamagic Cloud White ink to the plate. I ran the sandwich through my Cuttlebug machine. I got this subtle burnished velvet look. I stamped some clear Hero Arts leaves in the middle of my frame with Memento Bahama Blue ink. Added a Just Rite sentiment (Victorian Sentiments) and a green border using my NEW Parisian Accents Spellbinder set. I thought the green border needed something so I took my Tombow Glue pen and added some Mystique glitter dots on the border to tie it in a bit better. Thanks everyone for looking.

Sunday, July 17, 2011

Sizzix Ink It plate demo card 1

Here is 1 of the cards/techniques I demoed on Saturday using the new Sizzix Ink It plates. For those that missed the demo the Ink It plates are new on the market and designed to give a "letter press" type look on paper using your Cuttlebug or Big Shot machine. I must confess I did not really know what "letter pressing" was before I started playing with these new plates so when people mentioned letter pressing I just nodded like I knew what they were talking about!!! LOL
For those that don't know letter pressing is used in the professional printing world it involves "debossing" making an indent in the paper then appling ink to the debossed areas. It is different from embossing which raises the paper up and is more extreme. I should have taken some closer pictures of this sample so you could see what I mean. Here is a company that does letter press professionally and they have a good picture in their logo.
The above card is one of the first samples I made when I was playing with the new plates. I love how it turned out and I think this design might become my official Christmas card this year or at least until I get bored of the design and find a new one! :) The bottom part of the card is done with the Sizzix Rustic Trellis Ink It plate and Brillance Rocket Red pigment ink. The deer and sentiment are by A Muse stamped with the same Brillance ink. The store does still have both stamps in stock but they have been discontinued so if you need them hurry in. We still have quite a few of the Rustic Trellis plates still in stock. This card is a single layer card and to prevent the cardstock warping I used a 100lb cardstock also available at the store.
Thanks for stopping by!